HELPDESK
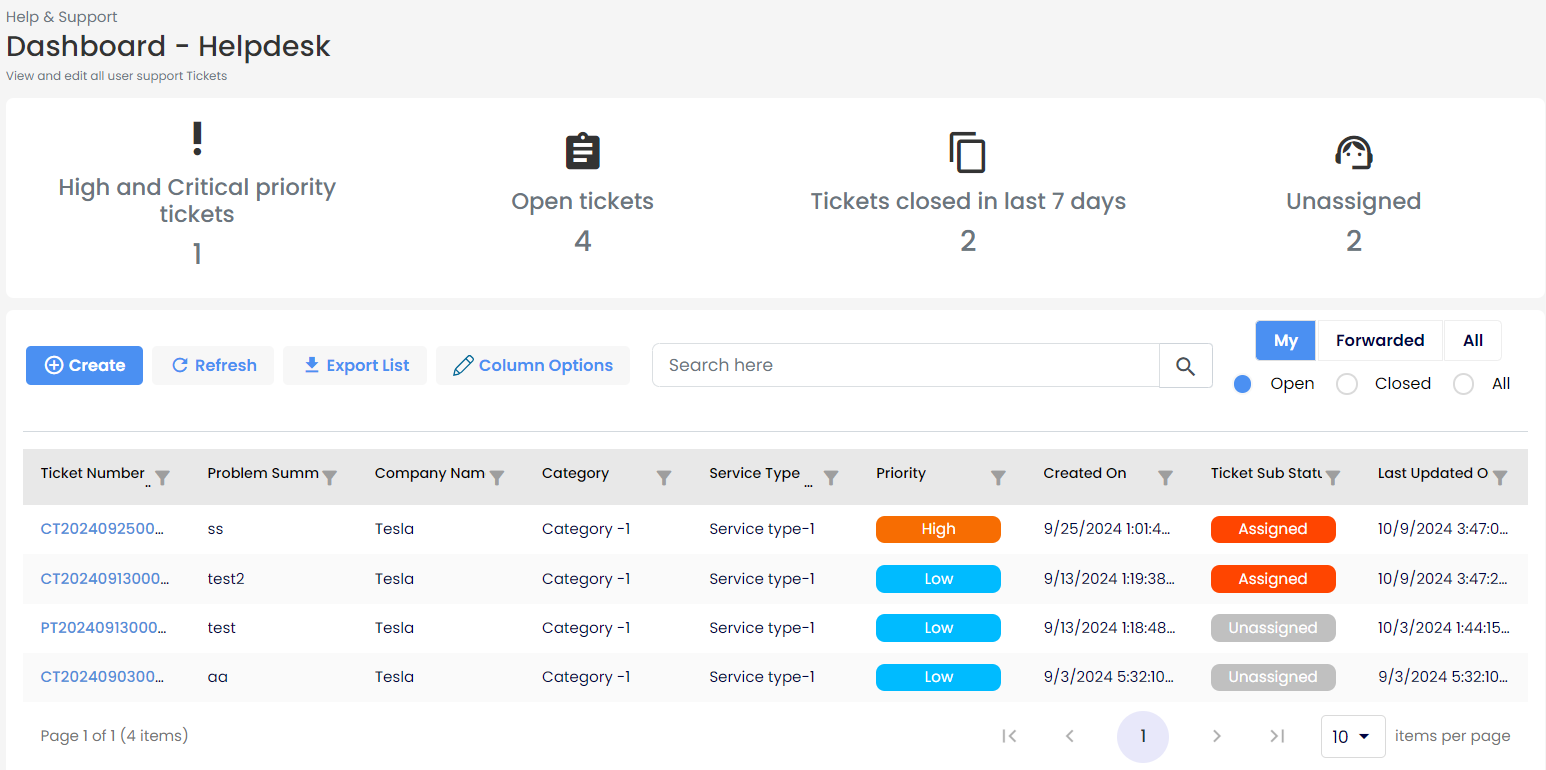
The Helpdes provides an overview of all ticket-related information, including:
- High and Critical priority tickets
- Open Tickets
- Total Tickets Closed
- Unassigned Tickets
Users can also export the list of tickets directly from the helpdesk.

Overview: The helpdesk layout includes filters and sorting options for easy navigation. It displays tickets assigned to Customers, Partners, Distributors, and Admins in their helpdesk page. Tickets can be sorted according to user preferences.
By default, the Open Tickets and My tabs are displayed, listing all open tickets for the user. Additional tabs like Forwarded, All, and Closed allow users to view tickets in different states.
Key Actions:
- View Ticket Details: Click on any ticket to access further information.
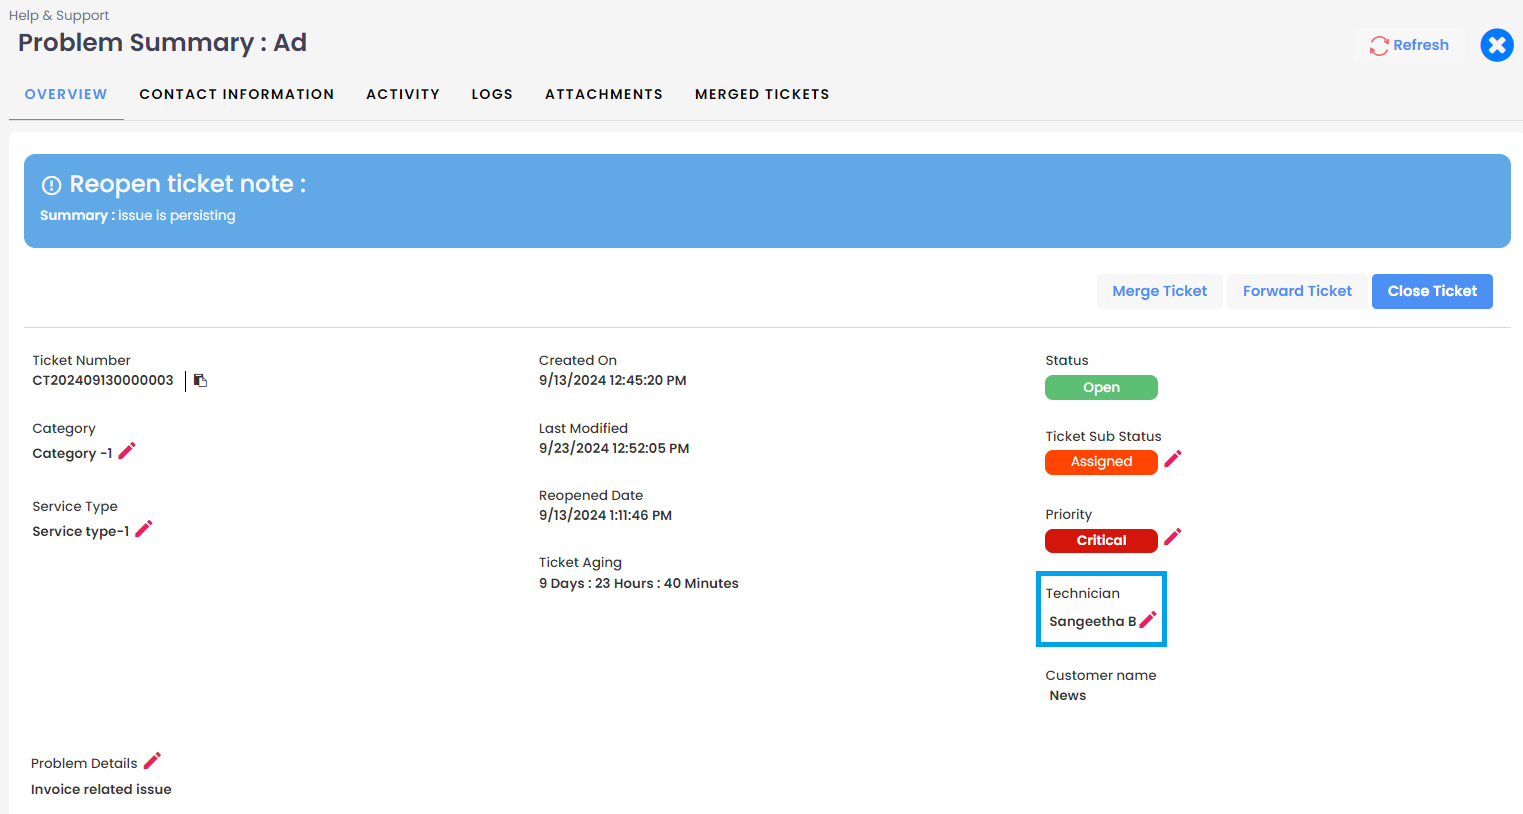
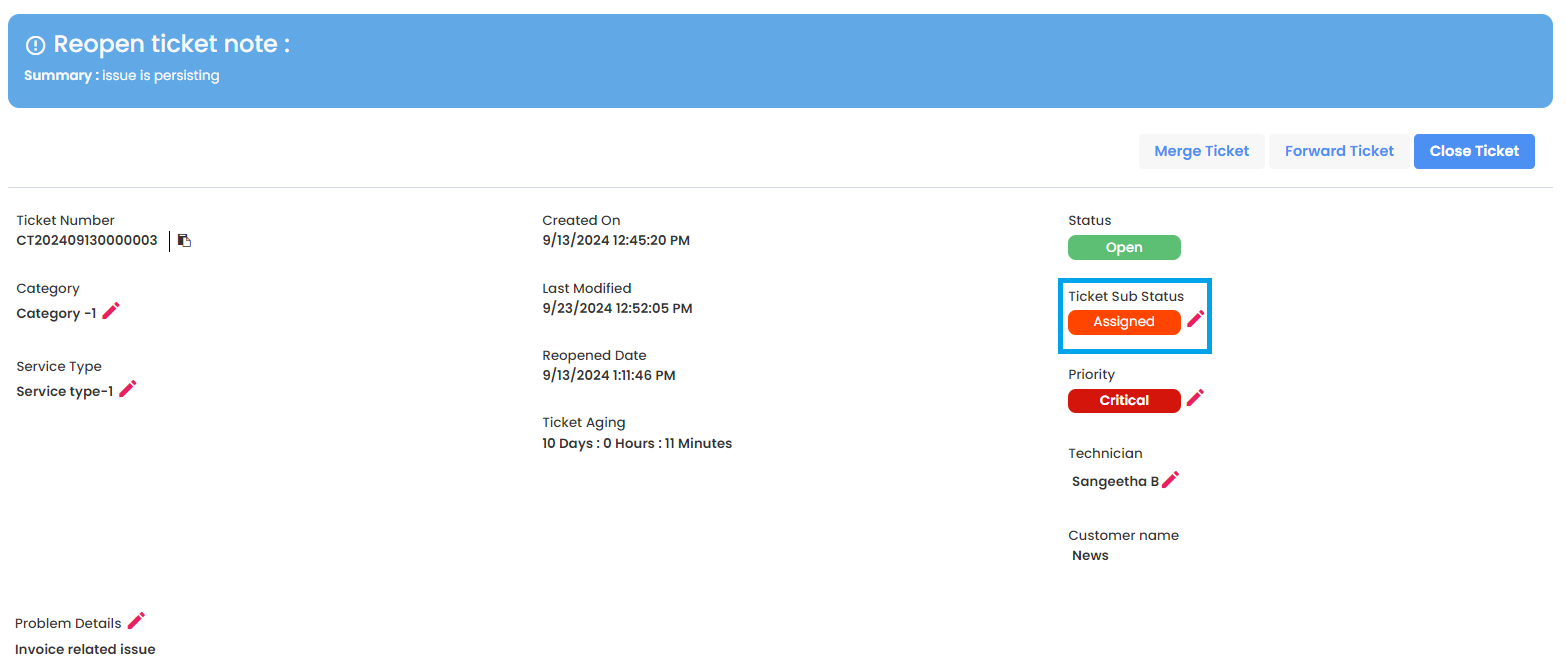
- Ticket Number: This is the unique identifier assigned to the ticket. In this case, the format starts with "CT" followed by the date and a sequence number. The ticket number helps track and reference the issue.
- Created On: The date and time when the ticket was initially created. This timestamp helps in tracking how long the ticket has been open.
- Last Modified: The date and time when any update or modification was last made to the ticket. This provides insight into the most recent activity on the ticket.
- Ticket Aging: Displays how long the ticket has been open, providing the total time since the ticket was created. This helps in monitoring how long the issue has remained unresolved.
- Category: This refers to the classification or type of issue the ticket relates to. Categories are often predefined and help in organizing tickets based on their nature.
- Service Type: Specifies the kind of service the ticket is related to. Similar to the category, it helps identify the context of the request or issue.
- Problem Details: This field describes the issue or problem reported in the ticket. It provides relevant information to the technician or support staff handling the case.
- Assign to Technician: Tickets can be assigned to technicians directly from the helpdesk. The ticket owner or the technician can perform this action.
- Change Priority: Based on the issue's urgency or importance, select the ticket's appropriate priority level.
- Forward Ticket: Forward the ticket to another tenant within the hierarchy for further handling.
- Re-open Ticket: If the ticket has been closed but the issue persists, it can be reopened for further investigation.
- Reply to Ticket: Users can respond directly to the ticket to provide updates or request more information.
- Merge Ticket: Merge Ticket allows users to combine multiple duplicate tickets into one to streamline ticket management and maintain clarity in issue resolution.
- Forward Ticket: Forward Ticket allows an assigned user to pass a ticket to a higher authority or a more suitable person when they are unable to resolve the issue.
- Close Ticket: If a resolution is found, the ticket can be closed.
Creating Tickets
Tickets can be created by using the Create Ticket button. Follow the steps below to create a ticket through the Create Ticket wizard, which consists of three sub-sections:
- Basic Details
- Contact Details
- Review and Create
To start, click the Create button under the Support module.
1. Fill Basic Details
Partner End:
If a Partner creates a ticket on behalf of a Customer, an additional field is displayed in the Basic Details section of the ticket creation wizard. This field, labeled Customer, is a drop-down menu where the Partner can select the Customer for whom the ticket is being created. The ticket number will be prefixed with CT, and the Customer can also see this ticket in their tenant.
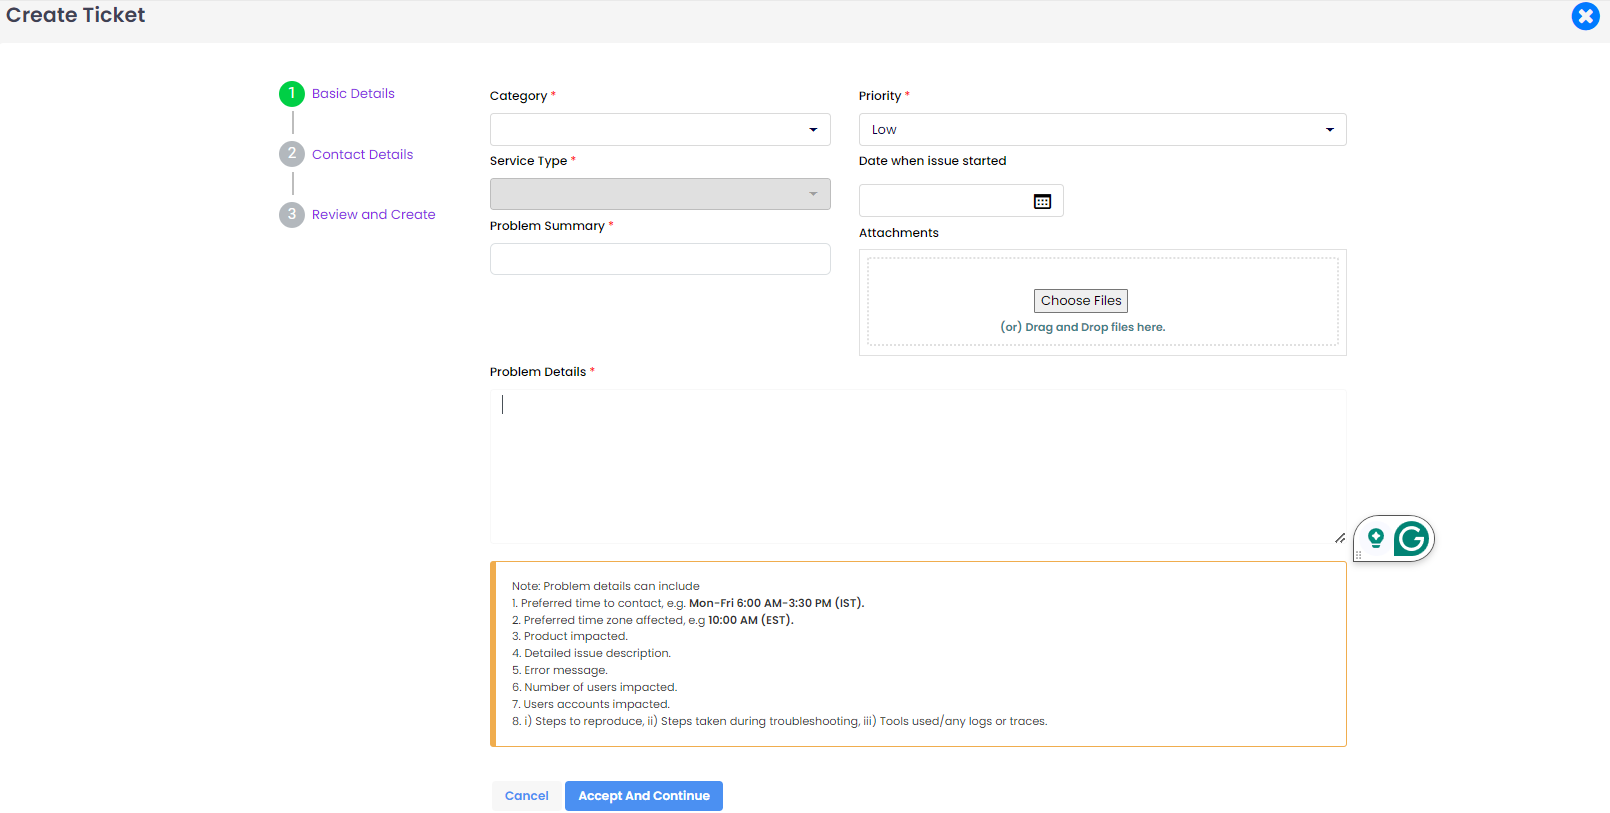
Customer: Select the customer from the drop-down list.
Customer End:
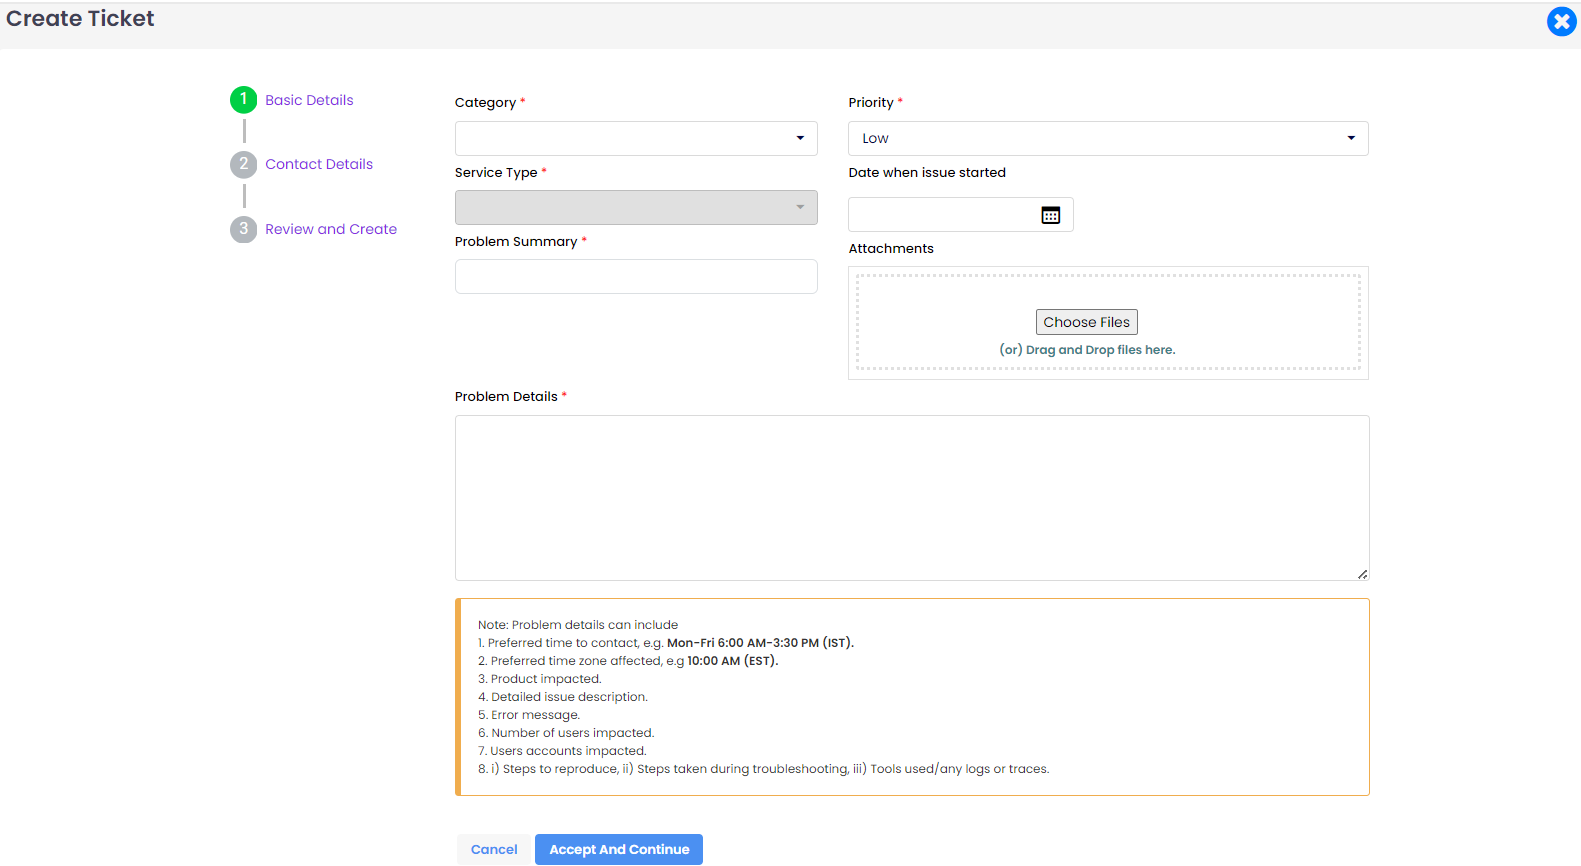
- Category: Select the category the issue belongs to from the drop-down list.
- Service Type: Select the type of service issue you are facing from the drop-down list.
- Priority: Set the Priority of the tickets based on impact.
- Critical - Severe impact, immediate attention needed.
- High - Significant impact, requires quick resolution.
- Medium - Moderate impact, needs timely attention.
- Low - Minor impact, can be addressed later.
- Critical - Severe impact, immediate attention needed.
- Date when issue started: Select the date when the issue began to impact.
- Problem Summary: Briefly describe the problem.
- Problem Details: Provide a detailed description of the issue.
- Attachments: Add supporting attachments to help the technician understand the issue better and provide a quicker solution. You can add attachments by dragging and dropping the file in the attachment section or by selecting from folders.
Once you have entered these details, click on the "Accept and Continue" button to navigate to the next page, which is Contact Details.
2. Add Contact Details
- Name: The system will default to the logged-in username. If you are creating a ticket on behalf of someone else, select the appropriate name.
- Phone Number: The system will default to the logged-in user's contact number. If you are creating a ticket on behalf of someone else, select the appropriate contact number.
- Email: The system will default to the logged-in user's email. If you are creating a ticket on behalf of someone else, select the appropriate email.
- Add Additional Users Email: This optional field allows you to add the email addresses of additional individuals who need to be notified about ticket activity. Multiple email addresses can be added by separating them with commas, e.g., abc@example.com, def@example.com.
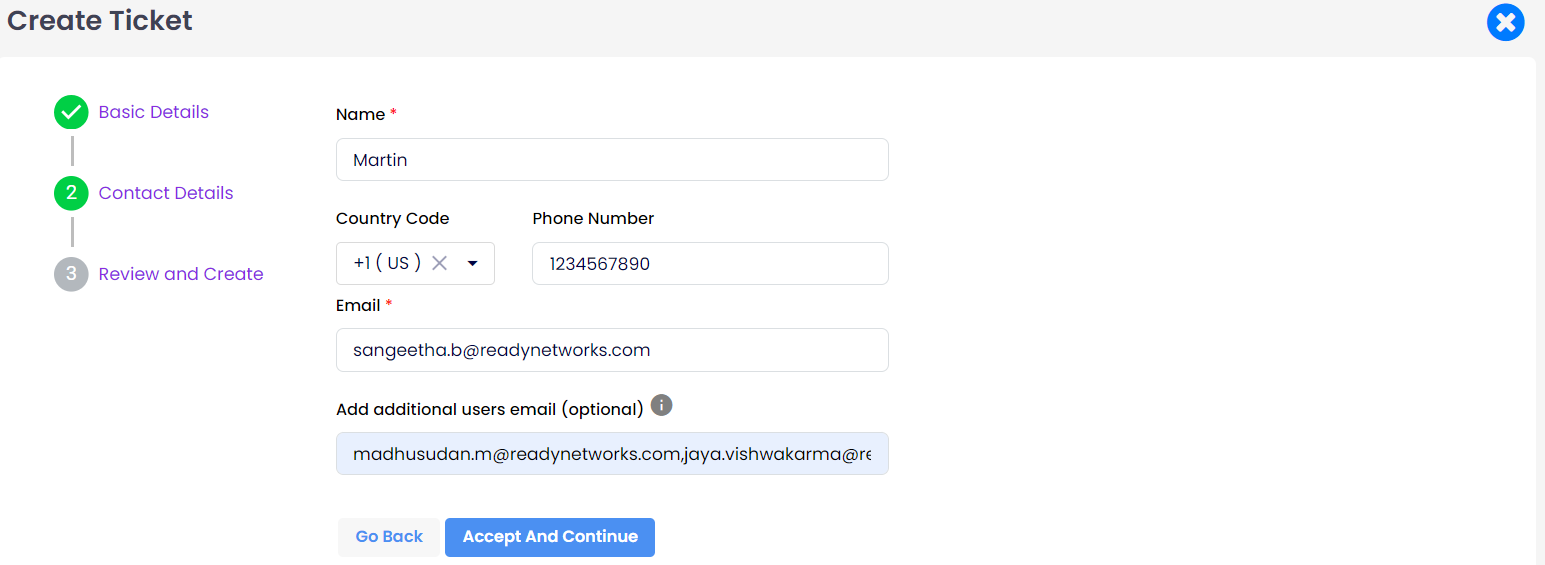
Once you have entered these details, click on the "Accept and Continue" button to navigate to the next page, which is Review and Create.
3. Review and Create
This page allows users to review the data entered for creating tickets and make any necessary edits. Once all the information is correct, click on the "Review and Create" button to create the ticket.
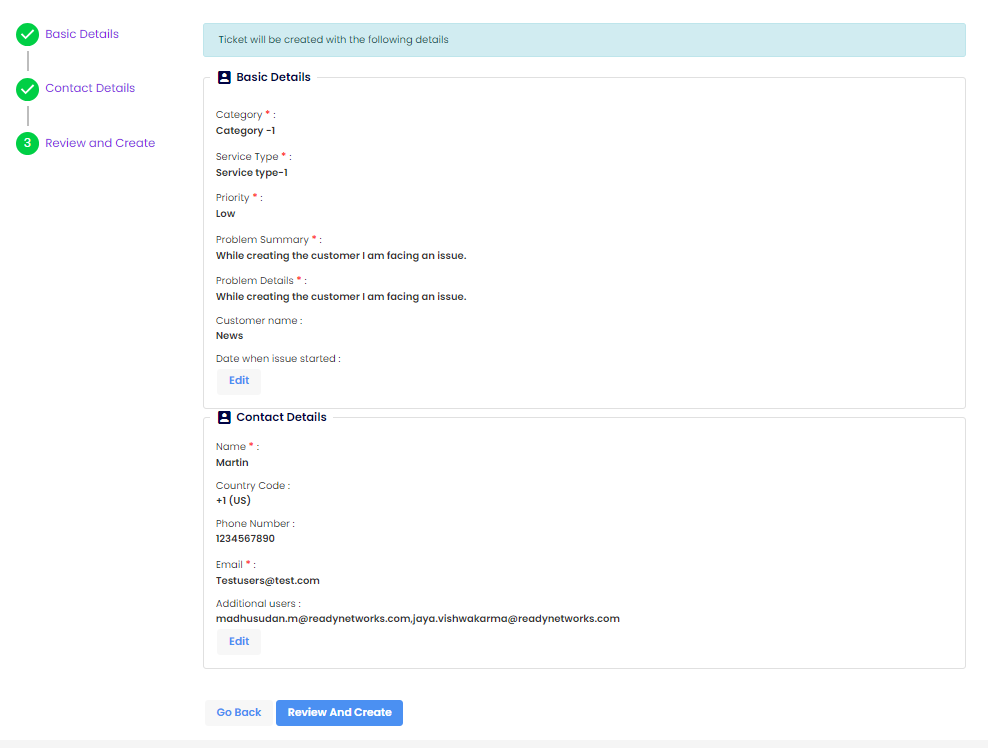
The ticket is created and is listed under the helpdesk dashboard.
Note
For easy identification of who has created the ticket, the ticket number will be prefixed as follows:
- CT for Customers
- PT for Partners
- DT for Distributors
↠ Customer created ticket

↠ Partner created ticket

↠ Distributor created ticket

Note
For Customers to configure Helpdesk, the Allow Helpdesk Configuration option must be enabled from the Customer Overview page, accessible via Partner login.

Once the Allow Support Configuration is enabled in the partner tenant, the following options are also enabled in the customer tenant: Helpdesk and Configuration.
Features of Helpdesk
1. Assigning Ticket to technician
This process allows users to designate a specific technician to handle a support ticket, ensuring that the appropriate person is responsible for resolving the issue.
What Happens: When a ticket is opened from the helpdesk grid page, the user can click the edit (pencil) icon under the Technician field. This action opens the "Assign Technician" dialog, where the user can select a technician from a list. After selecting and clicking Save, the chosen technician's name will appear in the Technician field, indicating they are now assigned to that ticket.
An email confirmation will be sent to the technician, the ticket owner, and the tenant owner.
Why This is Given: This feature is provided to streamline ticket management and ensure accountability in resolving customer issues. By assigning tickets to specific technicians, organizations can improve response times and maintain clear ownership of support requests.
Who Can Do This: Typically, users such as administrators, module admins, Global admins, and contributors at the particular tenant's level can assign technicians to tickets. This allows authorized personnel to delegate tasks effectively within the support system.
To assign a ticket to a technician, follow these steps:
- Open the ticket from the helpdesk dashboard.
- Click on the edit (pencil) icon located under the Technician field.
- The "Assign Technician" dialog will appear.
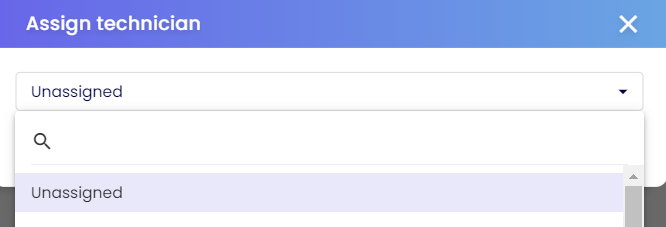
- Select a technician from the list and click Save. The technician is now assigned and displayed in the Technician field.
2. Changing Ticket Priority
Changing the priority of a ticket is essential for effective ticket management and resource allocation. By categorizing tickets based on their urgency and impact, organizations can ensure that critical issues receive immediate attention while less urgent matters are addressed in due course. This helps maintain operational efficiency, improves customer satisfaction, and allows support teams to focus on resolving the most pressing problems first.
To change the priority of a ticket, follow these steps:
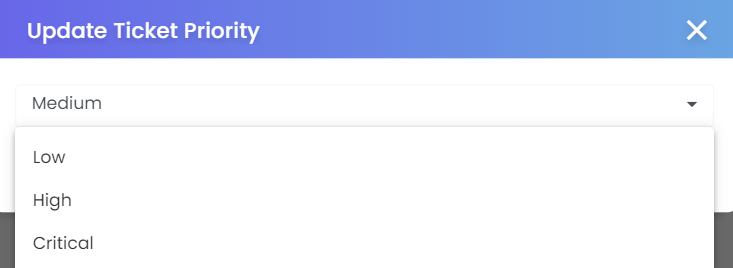
Click on the edit (pencil) icon under the Priority field.
The "Priority" dialog will be displayed, showing the following options:
- Low: For issues that do not significantly impact operations and can be addressed later.
- Medium: For important issues that should be resolved in a timely manner but do not require immediate attention.
- High: For issues that have a significant impact and should be addressed promptly, but are not urgent enough to require immediate resolution.
- Critical: For urgent issues that severely impact operations and need an immediate resolution to restore functionality.
Select the appropriate priority based on the impact and click Save.
The new priority will be updated on the ticket.
3. Ticket Sub status
Purpose: The sub-status of a ticket is crucial for tracking its progress and allows users to see the current status of tickets at a glance.
- After a ticket is assigned to the technician, the sub-status field gets enabled for editing.
- The technician can click on the Edit Sub-status option to make the necessary changes based on the ticket's progress.
Description of Sub-statuses:
- Unassigned: This status is used when no technician or team member is assigned to the ticket yet.
- Assigned: The ticket has been assigned to a technician, who is responsible for handling it.
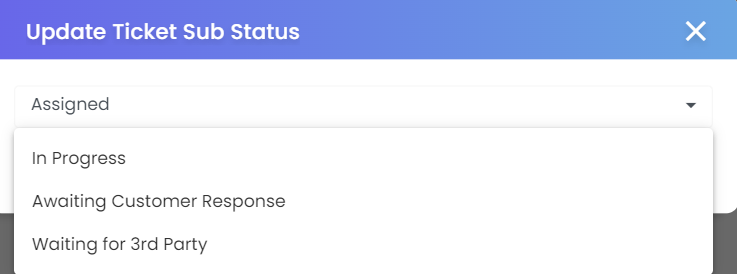
- In Progress: Indicates that the assigned technician is actively working on the ticket.
- Awaiting Customer Response: The technician is waiting for additional information or feedback from the customer before proceeding further.
- Waiting for 3rd Party: This indicates that the resolution of the ticket depends on an external party (Microsoft) vendor, and the technician is on hold until their response is received.
Editing Sub-status:
The technician can change the sub-status of the ticket as needed, based on the progress or requirements. For example:
- Set to In Progress once the technician starts working on the issue.
- Set to Awaiting Customer Response if the technician needs more information from the customer.
- Set to Waiting for 3rd Party if the issue is dependent on an external provider.
- Set to In Progress once the technician starts working on the issue.
If the assignment is changed or the technician is unassigned, the sub-status is reset automatically, and the new technician can update the sub-status as needed.
4. Forward Ticket
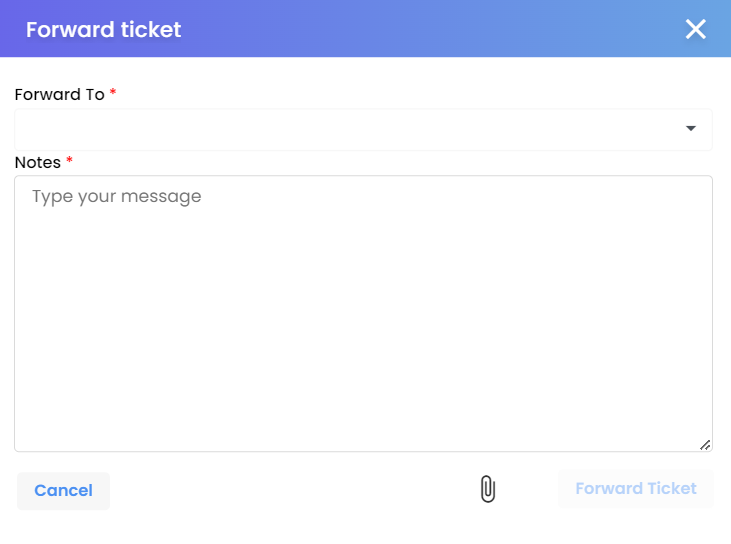
If an assigned person believes they are unable to handle a ticket, they can forward it to the next higher hierarchy. For example, if a Partner cannot resolve an issue, they can forward the ticket to their Distributor or Admin.
Note
Once the ticket is forwarded, the previous ticket handler will no longer be able to perform any actions on that ticket.
5. Closing a Ticket
Once a ticket has been resolved and a solution provided to the affected user, the ticket can be closed. The ticket can be closed either by the person who provided the solution, the person who created the ticket, or the technician who handled the ticket.
To close a ticket, the person closing it must provide proper comments, including resolution details, in the Closure Summary/Ticket dialog. Adding attachments, such as relevant screenshots, is optional. This information will be listed on the ticket details page along with the closing status.
Once a ticket is ready to be closed, follow these steps:
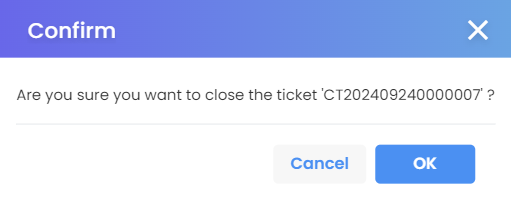
- Click the Close Ticket button. A confirmation dialog window will appear asking, 'Are you sure you want to close this ticket?'
- Click OK to proceed.
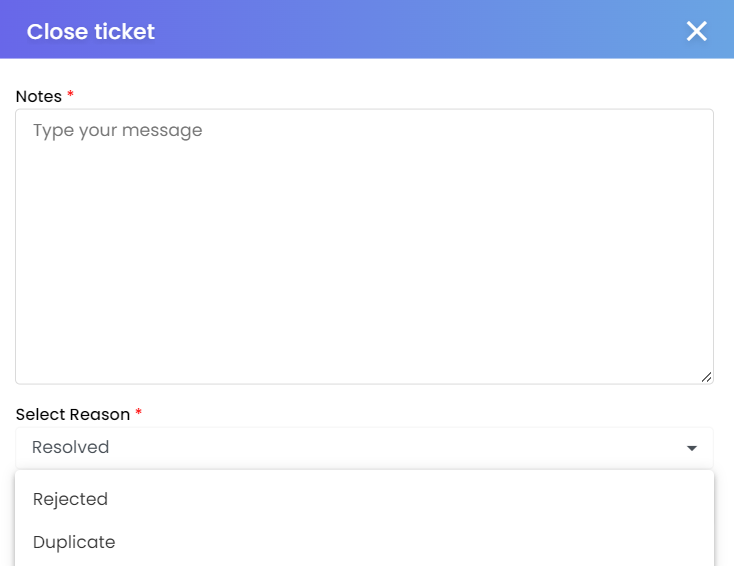
- In the next window, fill in the Notes section with any relevant details.
- Select the reason for closure from the following options:
- Resolved: The issue has been successfully addressed.
- Rejected: The ticket is being closed without resolution.
- Duplicate: The ticket is a duplicate of another issue.
- Resolved: The issue has been successfully addressed.
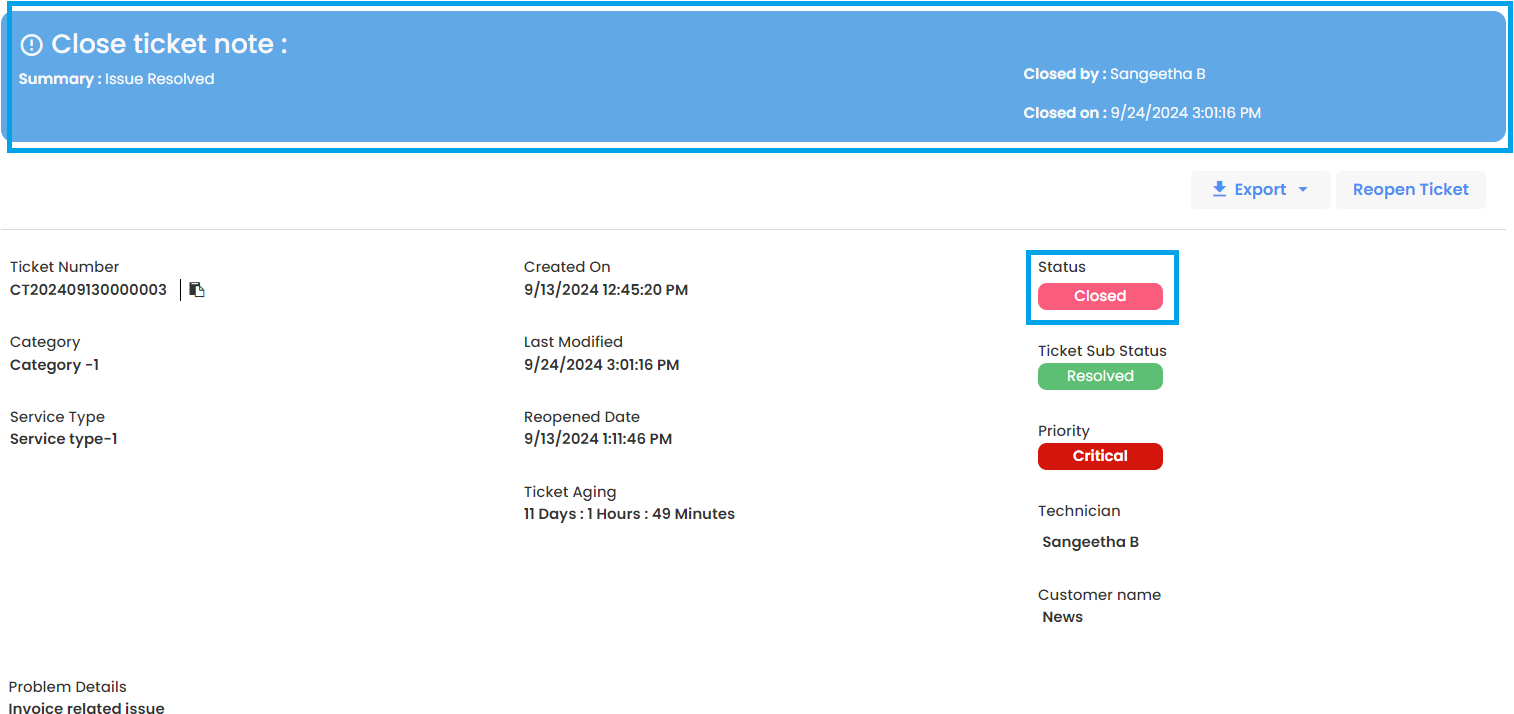
Once the ticket is closed, the reason for closure can be seen on the ticket details page.
6. Re-open Ticket
Note
The person who created the ticket, as well as users with the appropriate permissions, have the option to re-open it if they are unsatisfied with the resolution or if the issue reoccurs.
To reopen a ticket, follow these steps:
- Click the Re-open Ticket button.
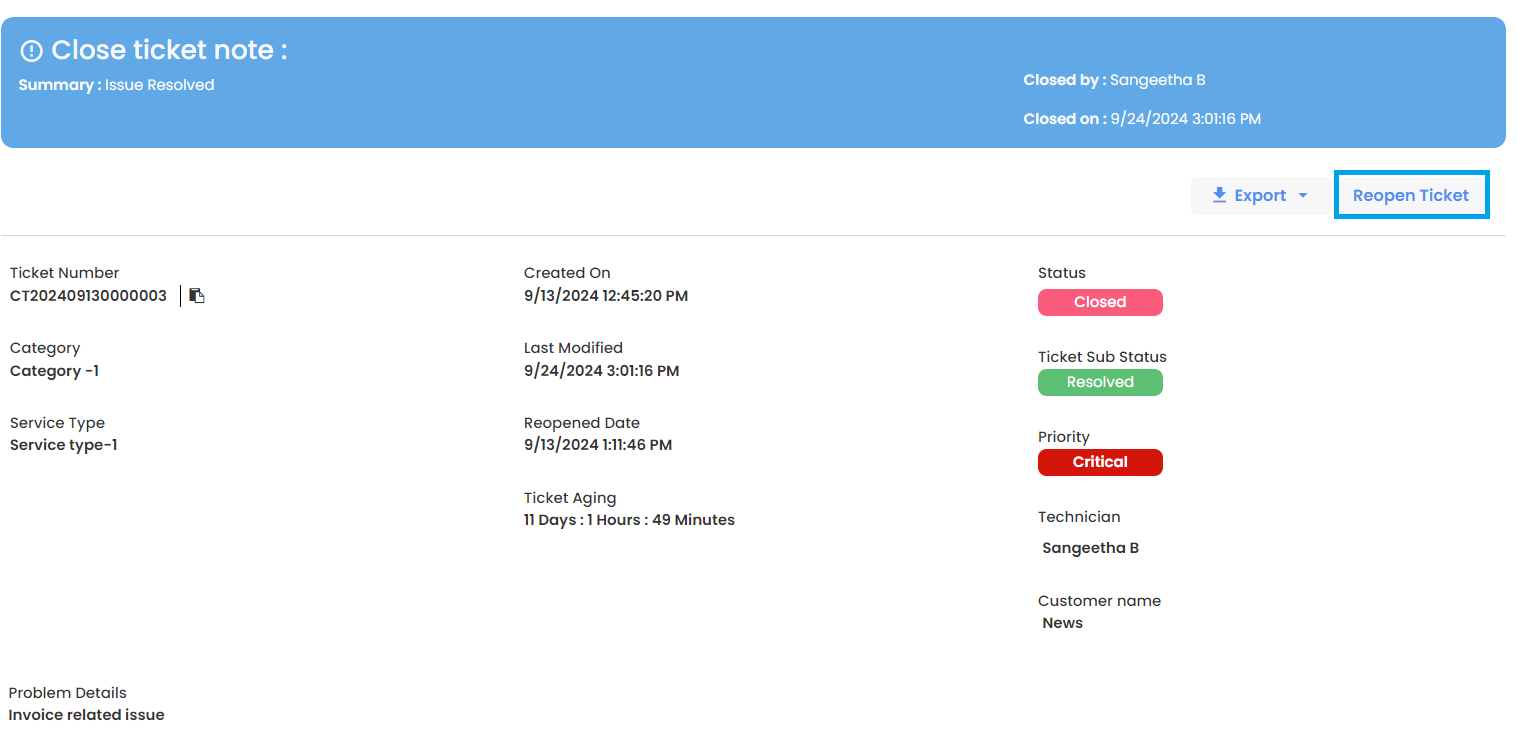
- This will open the Reopen confirmation dialog. Click OK in the confirmation dialog to proceed.
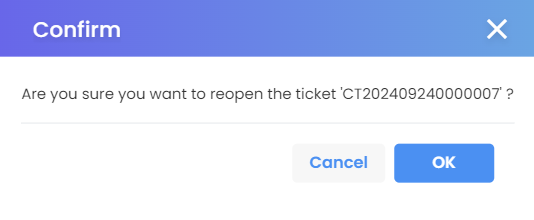
- The Re-open Ticket dialog will be displayed. Provide comments explaining why the ticket is being reopened and attach any relevant files if necessary.
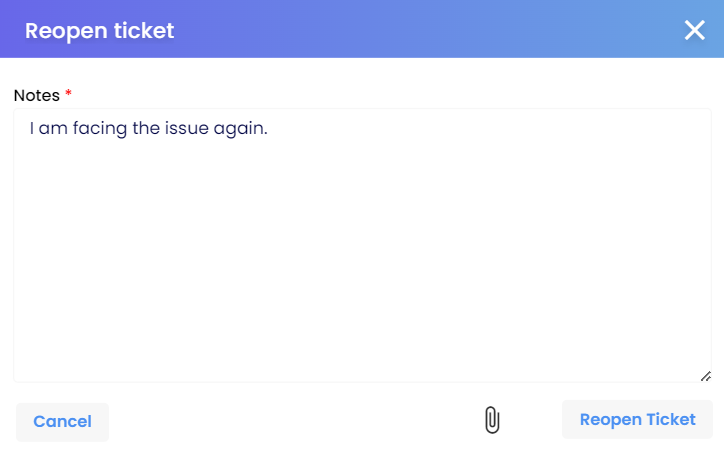
- Click the Re-open button to finalize the action, and the ticket will be reopened.
Note
All actions taken on the ticket, from creation to closure, will be communicated via email to all users who were mentioned when the ticket was created.
7. Contact Information
In the "Contact Information" section, you see details about the user associated with the ticket.
- Name: Shows the name of the user.
- Country Code: This displays the country code for the phone number, in this case, "+1 (US)" indicating the United States.
- Phone Number: Displays the user's contact phone number.
- Email: Shows the email address associated with the user.
- Additional User Mails: Here, you can optionally add one or more email addresses for additional users who should receive notifications about the ticket.
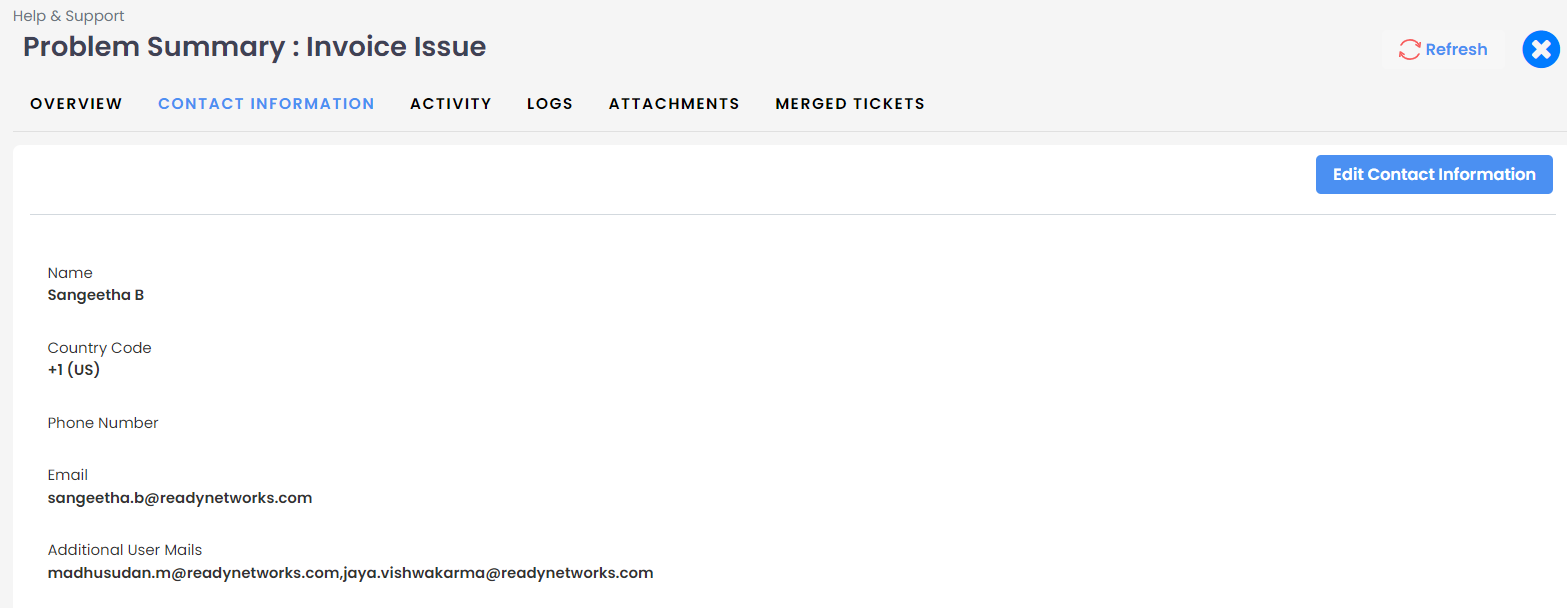
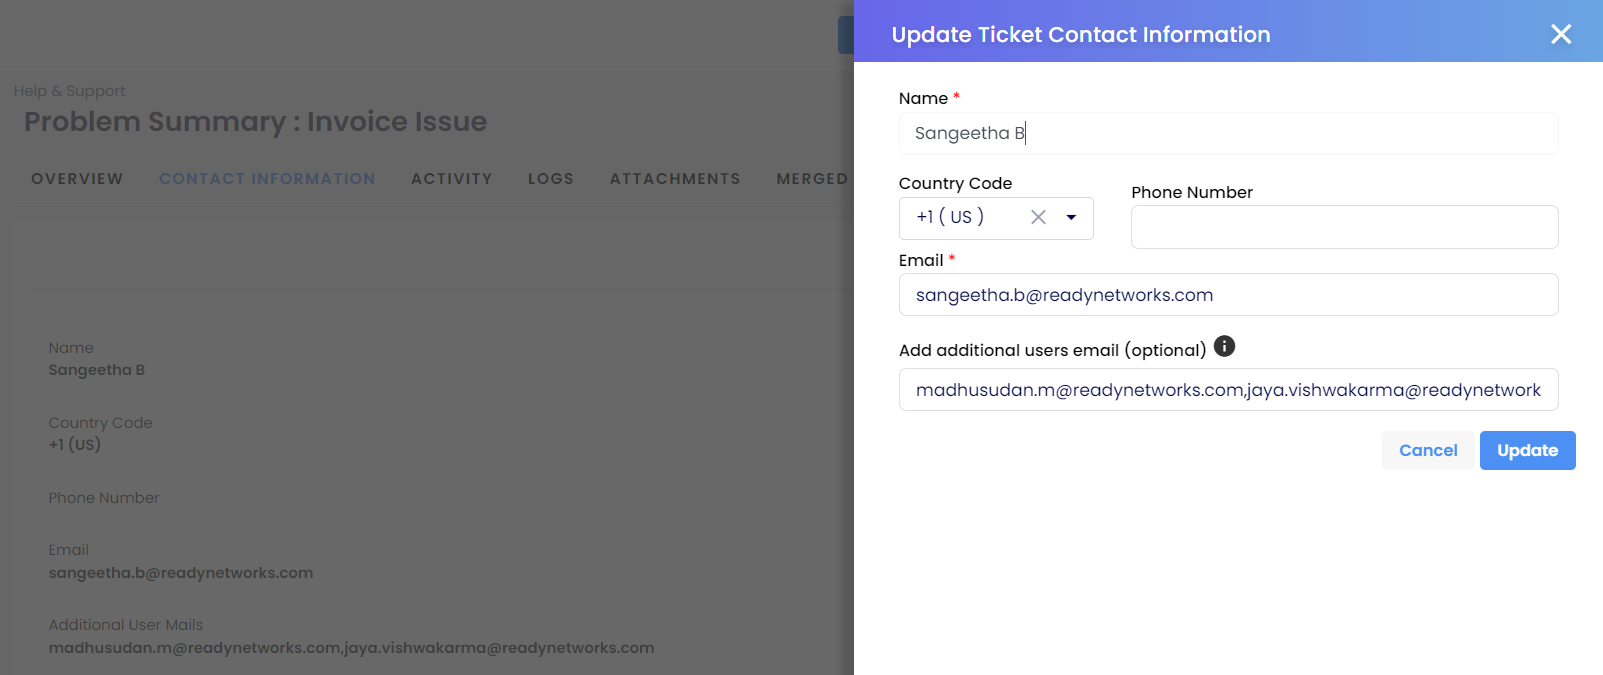
Edit Contact Information: Allows the user to update the contact details for the ticket by clicking the "Edit Contact Information" button.
8. Replying a Ticket
If the Technician requires more information regarding a ticket, or if the person who created the ticket wants to add additional details, they can do so by following these steps:
Click on the Activity tab on the ticket details page.
On the Activity details page, you have the following options:
- Add a comment.
- Add a comment with images or a screenshot.
- Add a comment.
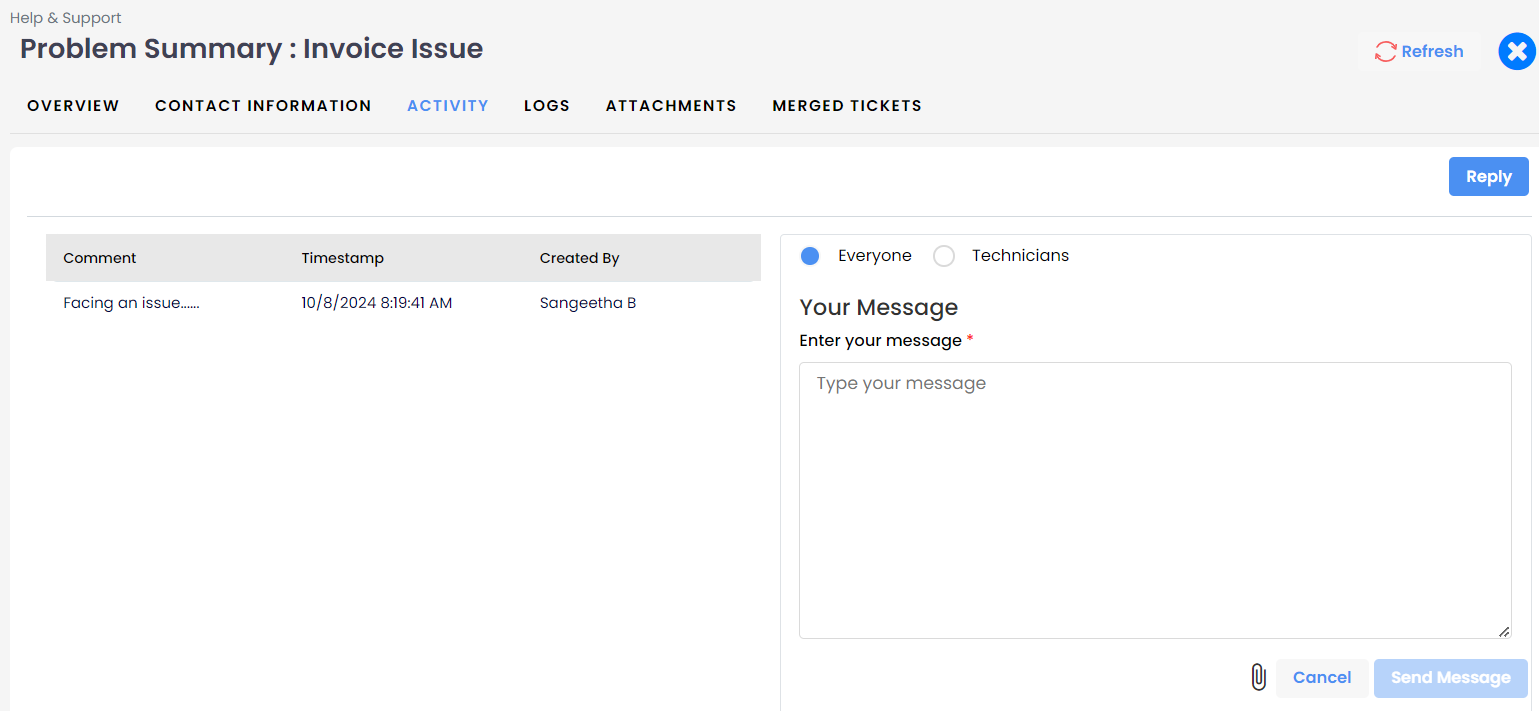
To add comments and images, click the Reply button. This will open a dialog for adding comments and attachments.
Enter your comments and attach any images, then click Send Message.
Once a comment is added, all users who were mentioned when the ticket was created will receive a notification.
All replies from the ticket logger and ticket handler will be listed in this tab.
Everyone: When this option is selected while replying (by a Partner or higher role), the reply message is sent to everyone, including the Customers.
Technicians: When this option is selected while replying (by a Partner or higher role), the reply message is sent to all users except Customers.
- If it’s a customer ticket, the customer will not be notified.
- If it’s a partner ticket, the partner will not be notified if any comments are added.
- If it’s a customer ticket, the customer will not be notified.
Comment: This is a section where users can leave comments or messages regarding an issue they are facing.
Timestamp: This field records the time at which the comment or action was taken. It indicates the exact date and time when the comment was posted.
Created By: This field specifies who created the comment or raised the issue.
Action Buttons:
- Cancel: This button is for canceling the message you're writing, and returning the form to its previous state.
- Send Message: This button is used to send the typed message once it’s ready.
- Cancel: This button is for canceling the message you're writing, and returning the form to its previous state.
9. Logs
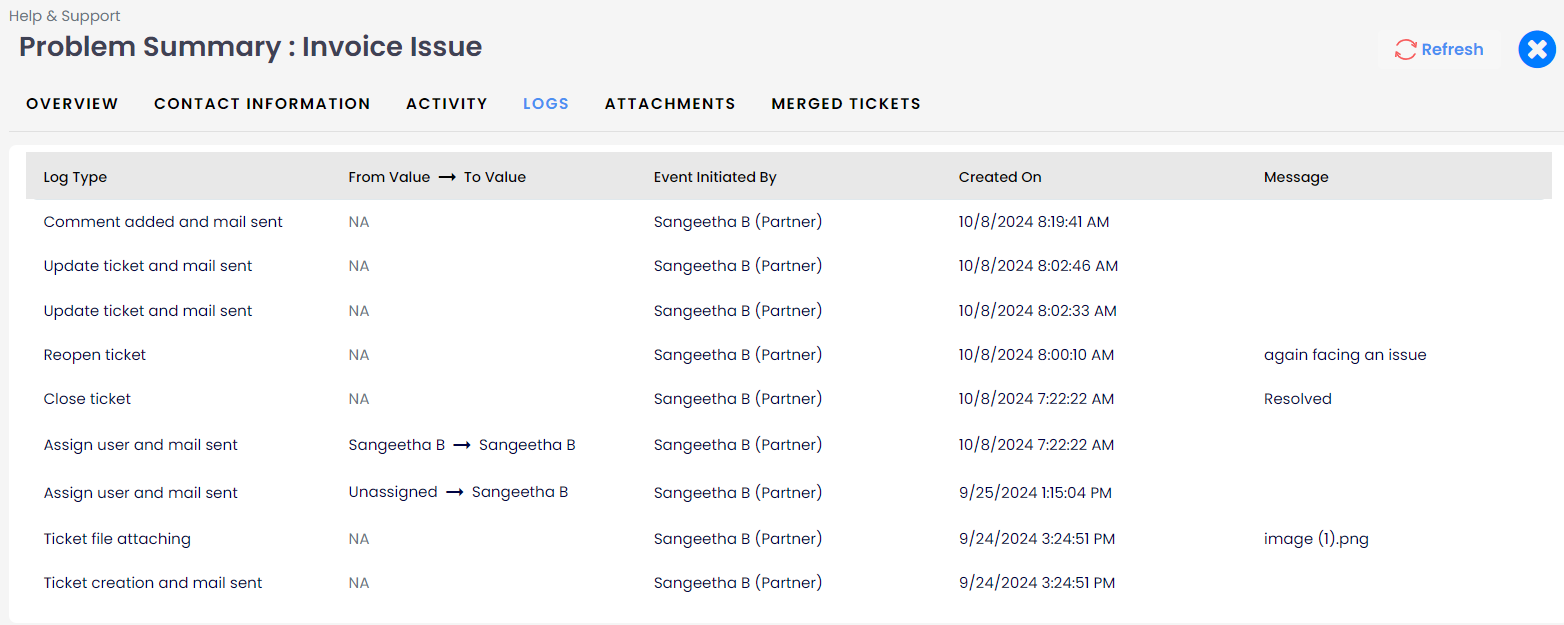
It records the history of activities on a ticket.
Log Type: This column displays the type of activity or action that took place in the system.
From Value ➡ To Value:
- This column typically tracks the changes in the values before and after an update. It shows the old and new values when there is a change in the status or priority, for example.
- In this case, both logs have "N/A" (Not Applicable), meaning the logs were either actions that didn’t involve changes to any values, or this field is not relevant for the types of activities logged.
- This column typically tracks the changes in the values before and after an update. It shows the old and new values when there is a change in the status or priority, for example.
Event Initiated By: This column records who triggered the event or made the change.
Created On: This field captures the date and time when the activity or event occurred.
Message: This column might display a more detailed message or description of the log entry.
10. Attachment
It shows a list of files that have been uploaded to a specific ticket.
File Name: This column displays the name of the uploaded file.
Size: This column shows the size of the file that has been uploaded.
File for: This column indicates the purpose or context in which the file was uploaded.
4Uploaded By: This column shows who uploaded the file. Supported formats include PNG, JPG, video files, documents, Excel, PDF, and other common file types.
Uploaded On: This column records the date and time when the file was uploaded.
Download and View:
- You can preview and download the attached image or file directly from this dialog.
- The download icon (⬇️) allows users to download the file, and the view icon (👁️) allows users to preview the file.
- You can preview and download the attached image or file directly from this dialog.

11. Merging Ticket
Multiple tickets can be merged if they are identified as duplicates. Once merged, the tickets are considered closed, keeping one open.

Ticket merging can be done from the Ticket Overview page in two ways:
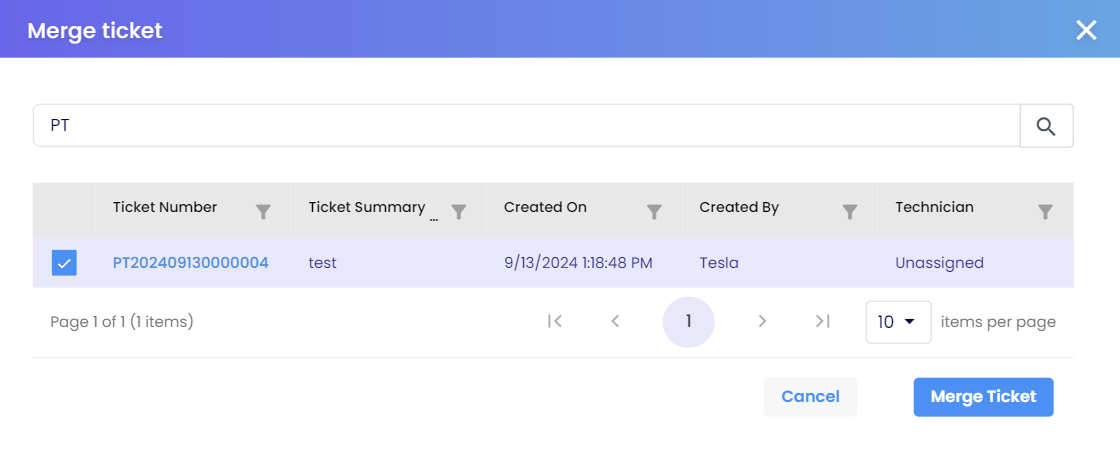
1. Using the "Merge Ticket" Button:
- Click the Merge Ticket button. This will open the Merge Ticket dialog. In the dialog, select the duplicate ticket you want to merge with. Once the merge is complete, the open ticket will be marked as "Closed" and labeled as "Duplicate."
2. Using the "Merged Tickets" Tab:
- Click on the Add Duplicate Tickets button in the Merged Tickets tab.

You can search and select multiple tickets by typing in the search field.
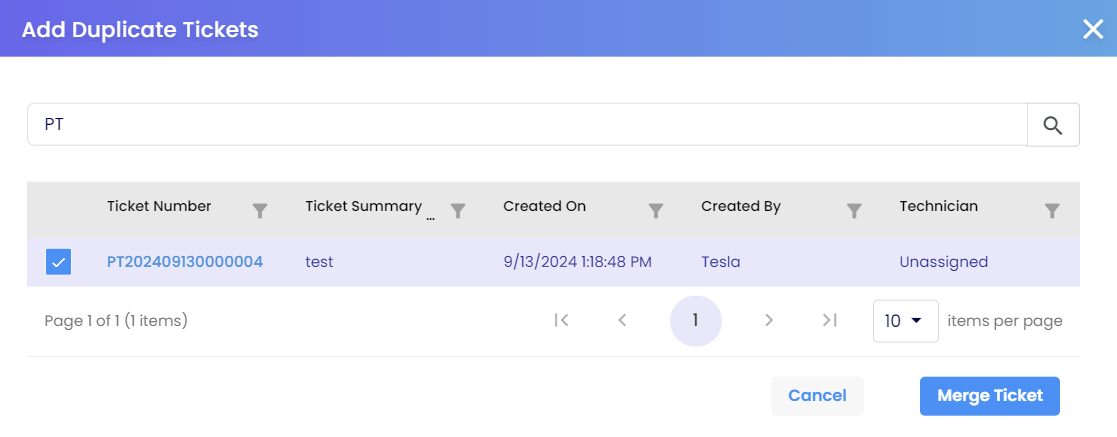
- Once the duplicate tickets are added, they will be marked as "Duplicate" and their status set to "Closed."
- The primary ticket will remain open and is considered the original, containing all relevant information about the ongoing issue.
- The tickets listed are associated with the Current Tenant and the Ticket Owner.
12. Unlinking Tickets
Tickets can be unlinked if the issue reoccurs or if the tickets were mistakenly merged and closed.
- To unlink tickets, navigate to the Primary Ticket or the ticket's Primary Tenant.
- The ticket can then be reopened.
- Tickets can also be unlinked from the Merged Tickets tab of the Primary Tenant.
13. Export Ticket
Users can export closed tickets and download the detailed information in a ZIP file. The ZIP file contains:
- A PDF file with ticket details.
- Attachments related to the ticket.
PDF file contains:
- Problem details
- Contact information
- Activities and logs
- Merged tickets
Attachments:
All files or attachments added during ticket creation, replies, forwarding, or in the closing summary will be included in this section.

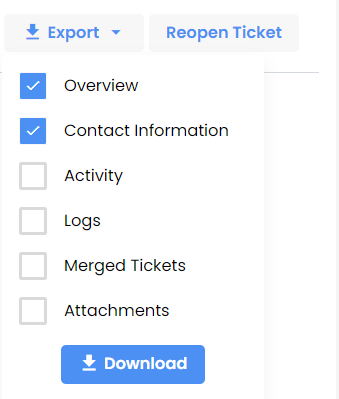
By default, the Ticket Overview and Contact Information are included in the export. Users can choose to include additional details such as Activity, Logs, Merged Tickets, and Attachments before exporting.
FAQs
Q. Who all receives email when a ticket is created?
A. All those users whose email id was added when creating a ticket.
Q. What kind of notifications are received on email?
A. All Kinds of email notifications are received. Ticket created, Reply, close ticket, Forward ticket, Priority changed, Technician Assigned, Ticket Re-opened
Q. How Partner will get to know that customer has created ticket?
A. Once customer creates a ticket, partner and customer both will get notification on mail. And customer created ticket will be added on the Helpdesk menu for partners.
Q. How to differentiate who created tickets?
A. Customers created ticket number starts with CT, where Partners created ticket number starts with PT.
Q. As a partner if i am unable to solve the customer problem, then what i should do?
A. You can forward that ticket to respective distributor or Admin.
Q. As a partner can i create a ticket on the behalf of Customer?
A. Yes, Partner can create on the behalf of customer.
Q. Can I change the priority of the ticket after creating the ticket?
A. Yes, Priority can be changed after creating the ticket also.
Q. If partner is unable to resolve the customers issue, can they directly forward ticket to admin?
A. Yes, Partner can bypass ticket to Distributor and directly forward it to Admin.