ONBOARDING
Customer onboarding is the process of integrating a customer, currently associated with an existing partner, into the MSP Hub for easier management. This process establishes necessary permissions, enabling partners to efficiently manage and monitor customer setup.
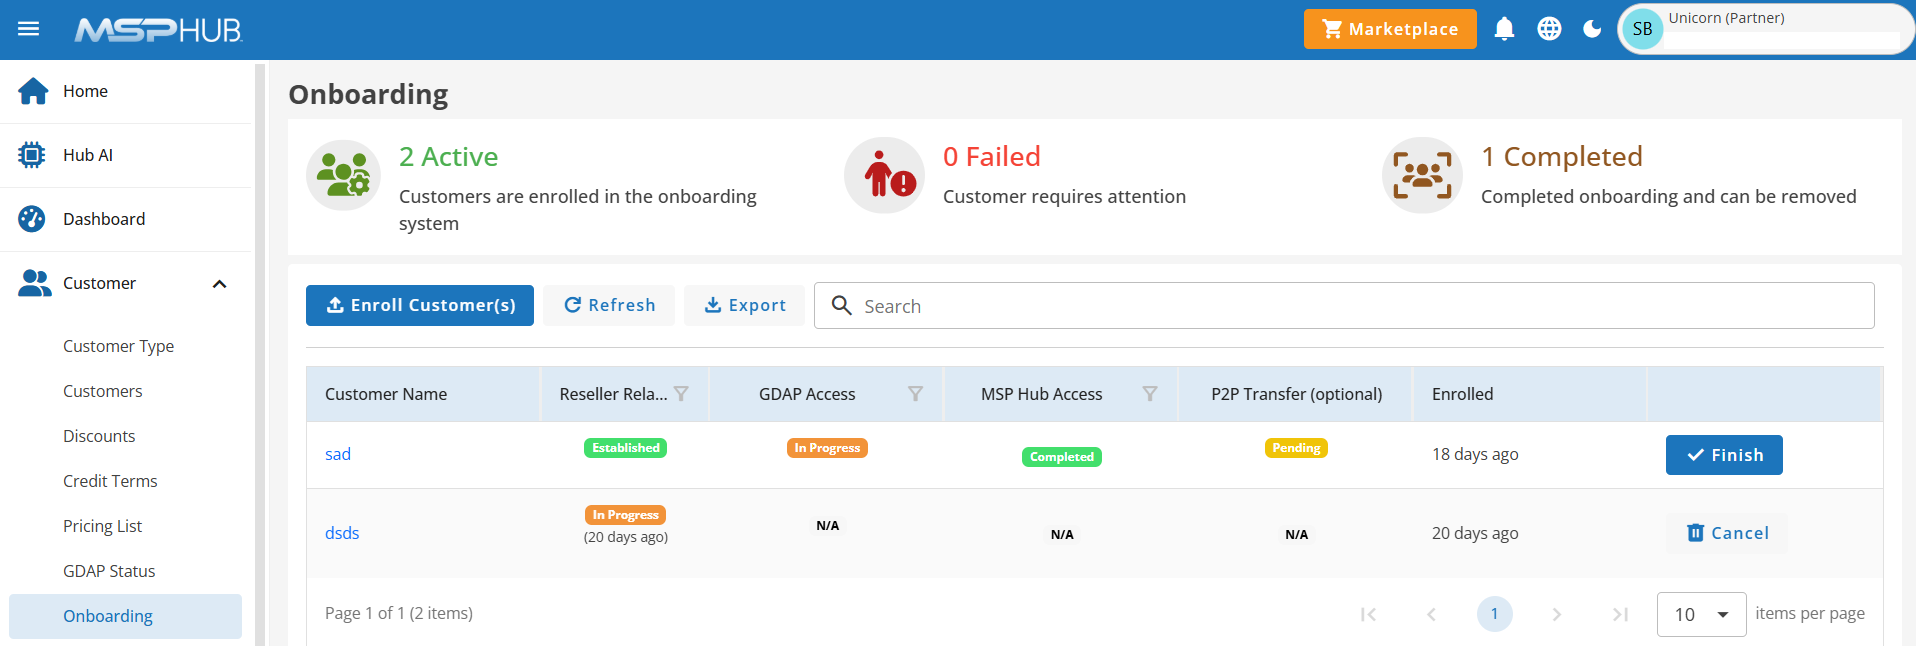
The Customer Onboarding menu simplifies managing new customer enrollments. It allows tracking the onboarding status, managing access permissions, and completing the onboarding process effectively.
Customer Onboarding Status Indicators
- Active: Indicates the number of customers currently enrolled in the onboarding process. These customers are actively being set up but haven't completed the full onboarding steps yet.
- Failed: Shows the count of customers whose onboarding process encountered issues and requires attention. This status helps identify and address errors quickly to resume the process.
- Completed: Represents the customers who have completed the onboarding process. These customers are fully set up and can be managed or removed if needed.
Overview of Fields
- Customer Name: Displays the name of the enrolled customer.
- Reseller Relationship: Indicates the status of the reseller relationship, such as Established or In Progress.
- GDAP Access: Displays the status of Granular Delegated Admin Privileges (GDAP) access. The possible statuses include In Progress, and Established.
- MSP Hub Access: Displays the status of MSP Hub access, which can be In Progress or Completed.
- P2P Transfer (Optional): Displays the Partner-to-Partner (P2P) transfer status. It can show statuses like Pending or Completed.
- Enrolled: Displays the time when the customer was successfully enrolled, shown in a relative format such as "yesterday" or "X" days ago.
- Actions (Cancel/Finish): Allows you to either Cancel the onboarding process or Finish it if completed.
Features Available
- Search Quickly locate customer name using the search option.
Enroll Customer(s):
Customers can be enrolled into the system using two methods:
1. Single Enrollment: Individually onboard a customer through the interface.
2. Bulk Enrollment: Upload multiple customer details at once for streamlined onboarding.
- Single Enrollment
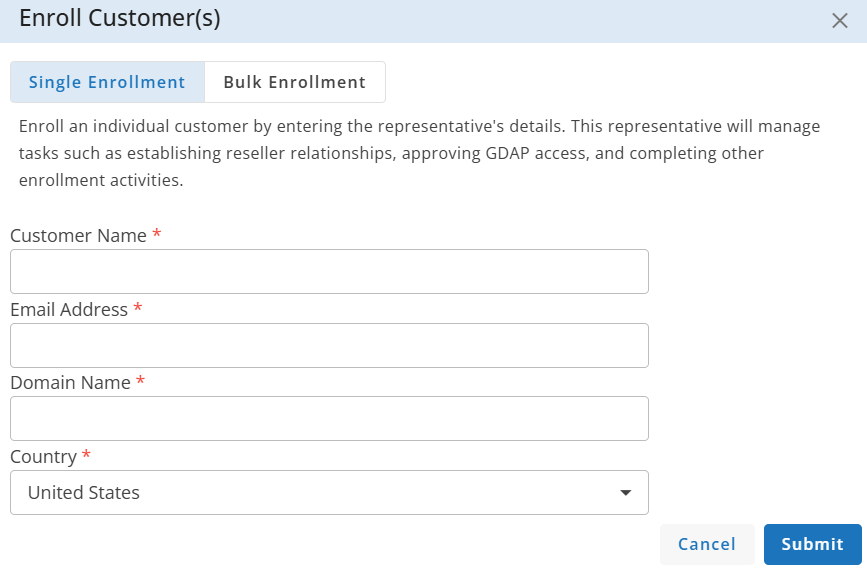
Single Enrollment allows you to enroll an individual customer by providing their representatives details. This process is ideal for adding one customer at a time.
- Customer Name: Enter the full name of the customer or the organization being enrolled.
- Example: ABC Technologies Inc.
- Email Address: Provide the customer representative's valid email address. This will be used for communication.
- Example: john.doe@abctech.com
- Domain Name: Enter the customer's domain name, which will be used to set up services and manage identities.
- Example: abctech.com
- Country: Select the customer's country from the dropdown list. This helps in regional service allocation and compliance requirements.
- Example: United States
- Cancel: Discards the information entered and closes the enrollment form without saving any changes.
- Submit: Finalizes the enrollment process by saving the provided details and initiating customer onboarding.
- Bulk Enrollment
Bulk Enrollment enables adding multiple customers simultaneously by uploading a CSV file containing their details. This method is efficient for enrolling large groups at once.
Steps
- Download Format File: Click to download the predefined CSV format.
- Prepare Data: Enter customer details in the provided format.
- Choose File: Upload the CSV file containing customer information.
- Review Customers: Verify the details before final submission.
CSV File Format Requirements
- Customer Name: Organization's name. (Example: Chevron Corporation)
- Email Address: Valid customer email address. (Example: chevroncorp@example.com)
- Domain Name: Customer's domain. (Example: chevron.onmicrosoft.com)
- Country Code: Country code of the customer. (Example: US, IN, EG, CA)
Click Download File Format to get the sample template and ensure proper data formatting before upload.

The Customer Grid Page displays a list of all enrolled customers, whether added through Single Enrollment or Bulk Enrollment. It provides a structured view of customer details for easy management and quick access.
Once a customer is enrolled, the reseller relationship status will be In Progress.

Reseller Relationship
A reseller relationship is created when a reseller sends an invitation to a customer. The customer must accept the invite to complete the relationship setup. Once accepted, the status changes to Established, allowing the reseller to manage and provide services to the customer.
Reseller Relationship Process:
- In Progress: This status indicates that the reseller relationship request has been sent, but the customer has not yet accepted it.
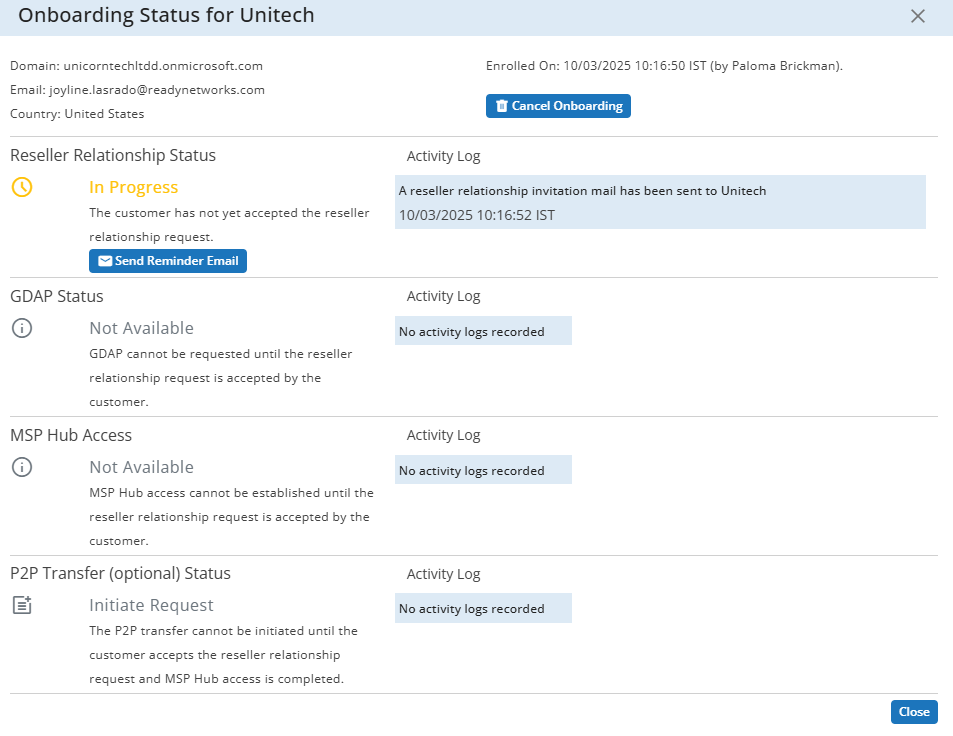
Send Reminder Email
This button allows resellers to manually resend the reseller relationship invitation if the customer has not accepted the initial request. By default, reminder emails are automatically sent after (24 hours), (48 hours), and 7 days (168 hours) if the request remains unaccepted.

- Established: Once the customer accepts the reseller relationship request, the Reseller Relationship Status changes from "In Progress" to "Established", indicating that the partnership has been successfully confirmed.

GDAP Access
Granular Delegated Admin Privileges (GDAP) is a security-enhanced model that allows resellers to manage customer environments with least-privileged access. Unlike traditional admin access, GDAP provides more control over permissions and scope, improving security and compliance.

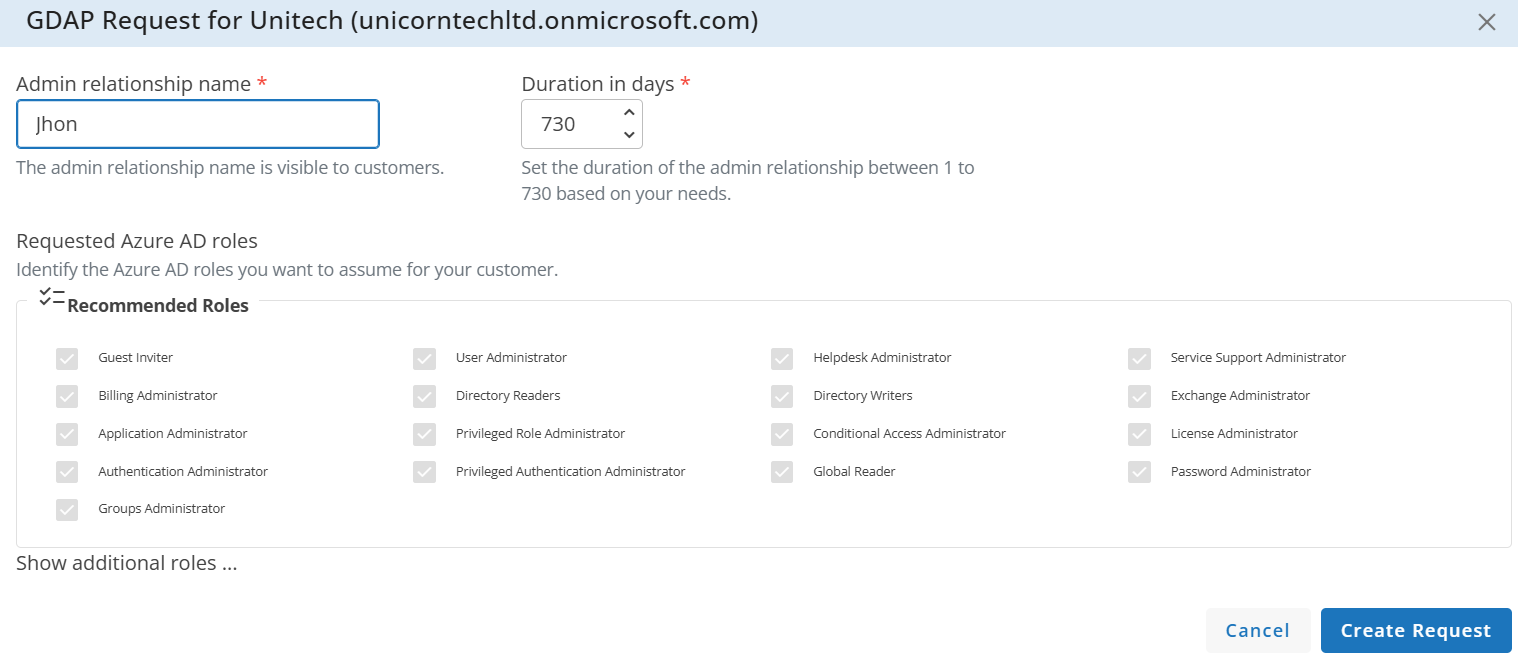
When you click "Create Request," the GDAP request page opens. Here, you can:
- Enter the Admin Relationship Name and set the Duration (1 to 730 days).
- View pre-defined Azure AD roles under Recommended Roles.
- Select additional roles if needed by clicking "Show additional roles" to customize access permissions based on requirements.
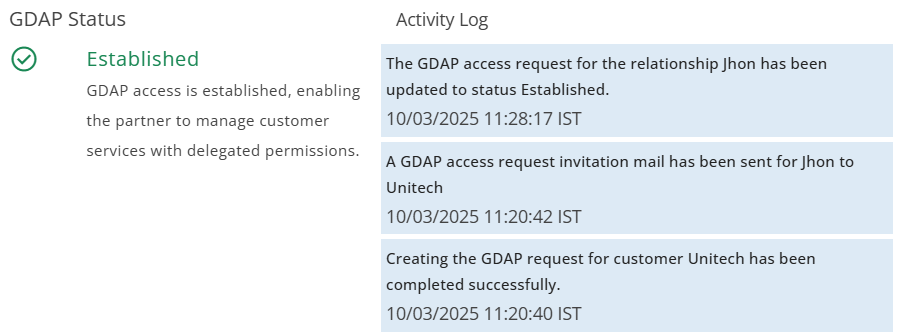
This section displays the status of the GDAP request with a customer, which can be:
- In Progress: The request has been initiated but not yet accepted.
- Established: The GDAP relationship is successfully set up and active.
- Expired: The previous GDAP relationship has ended.
Note
The duration of the admin relationship is set between 1 to 730 days. It will auto-extend by 6 months upon expiration. However, this auto-extension is not applicable if the additional role of Global Administrator is selected.

The customer will receive an email containing a link. Once the customer opens the link and approves the request, the status will change to Established.
If the customer does not approve the request within (24 hours), (48 hours), and 7 days (168 hours) of enrollment, an automatic reminder email is triggered. Additionally, the partner can manually resend the request at any time by clicking the Send Reminder Email button.
MSP Hub Access
MSP Hub Access allows customers to be integrated into the MSP Hub. By clicking the Start button, the customer creation page will open. (You can refer to the link for customer creation)

If the CSP account is already linked, some of the field details are pre-filled. The remaining fields must be entered manually, and the pre-filled details can be edited.

After completing the customer creation steps, the MSP Hub Access status initially appears as In Progress and updates to Completed once the process is finalized.

P2P Transfer
P2P (Partner-to-Partner) transfer enables the transfer of billing ownership for Azure subscriptions, Reservations, Savings Plans, or license-based subscriptions from one partner to another. This ensures a smooth transition of billing and subscription management while maintaining service continuity. To initiate the transfer, click the Initiate button.

Create Transfer Request
Below are the details of the fields in the create transfer request form:
Customer Name & Email ID
- Displays the customer's name and registered email address.
- This is the entity for which the billing ownership is being transferred.
- Displays the customer's name and registered email address.
Select Current Partner
- Select the partner currently managing the customer's billing and subscriptions from the dropdown menu. If the required partner is not listed, choose the Other option to manually enter the partner details.
- The selected partner will be the one transferring ownership.
- Select the partner currently managing the customer's billing and subscriptions from the dropdown menu. If the required partner is not listed, choose the Other option to manually enter the partner details.
Current Partner Name
- Auto-filled field displaying the name of the selected partner.
- Indicates the partner who is transferring subscriptions or billing ownership.
- Auto-filled field displaying the name of the selected partner.
Current Partner Microsoft ID
- Auto-filled field showing the Microsoft ID of the selected partner.
- The current partner can find their Microsoft ID by navigating to Account Settings and selecting Entra ID profile.
- Auto-filled field showing the Microsoft ID of the selected partner.
Current Partner Email Address
- Allows entering an email address for the current partner.
- Useful for communication or verification during the transfer process.
- Allows entering an email address for the current partner.
Action Buttons
- Cancel: Discards the request without saving any changes.
- Submit: Initiates the transfer request.
- Cancel: Discards the request without saving any changes.
Note
The transfer request will expire in 30 days if no action is taken.
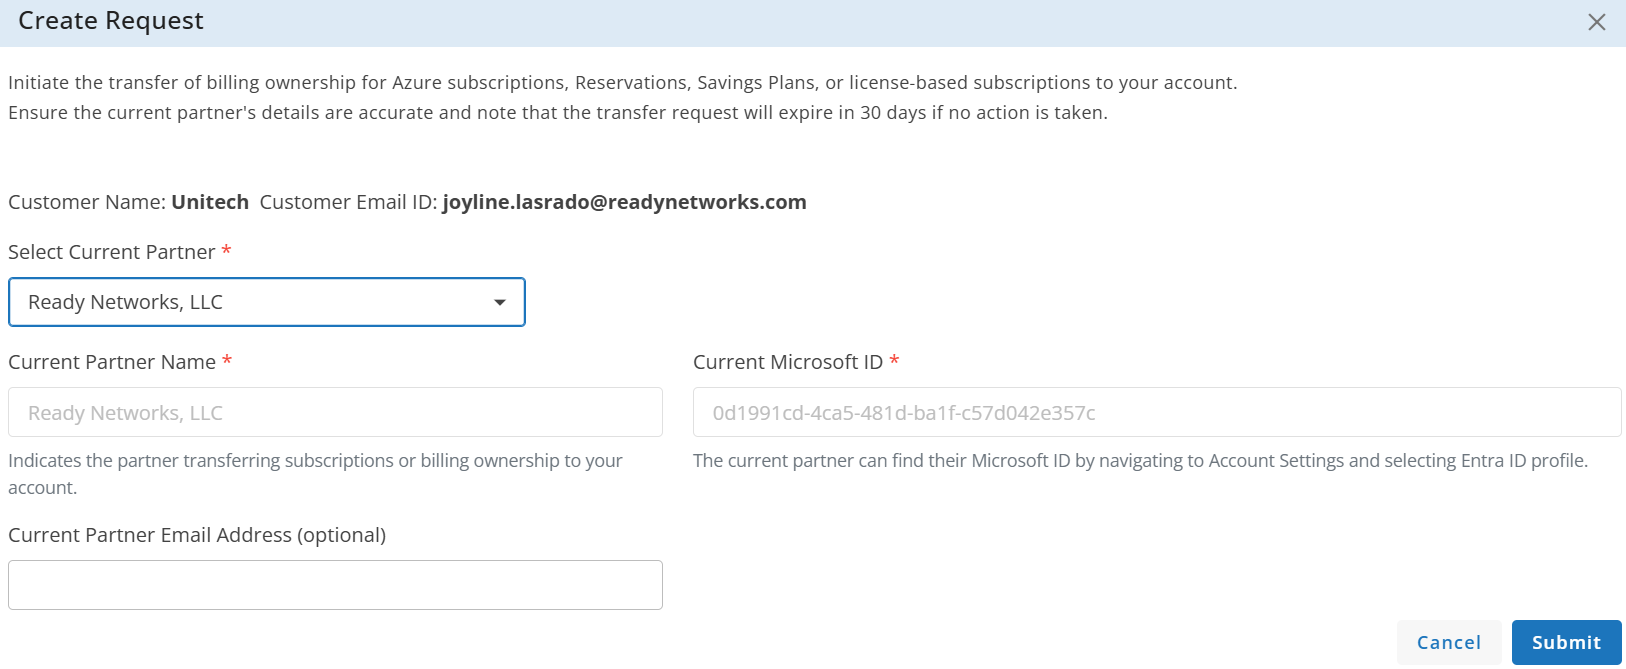
After filling in the details and clicking the Submit button, the P2P transfer status will change to Pending, and an email will be sent to the recipient, notifying them of the transfer request.

Send Reminder Mail
An automatic reminder email is sent if the recipient has not acted on the P2P transfer request within (24 hours), (48 hours), and 7 days (168 hours). Additionally, the partner can manually resend the request by clicking the Send Reminder Email button.
Cancel
- This button allows the user to cancel the ongoing P2P transfer request if needed.
- Once canceled, the transfer process will be stopped, and no further actions will be taken for this request.

Once the recipient accepts the P2P transfer request, the P2P transfer status will change to Completed.
Activity Log
The Activity Log records key events and status updates related to reseller relationships, GDAP access, MSP Hub access, and P2P transfers. It helps track actions performed and any issues encountered during the process.
Finishing the Onboarding Process
Once all the required steps are completed, including establishing the reseller relationship, granting GDAP access, completing MSP Hub access, and processing the P2P transfer (if applicable), the customer is successfully onboarded into the MSP Hub.
Finish
- Clicking the Finish button will trigger an information message.
- The information message states:
- The onboarding process is complete. The customer will be removed from the onboarding system.
- The onboarding process is complete. The customer will be removed from the onboarding system.
- Upon confirming, the customer will be removed from the onboarding system, finalizing the onboarding process.