CUSTOMERS
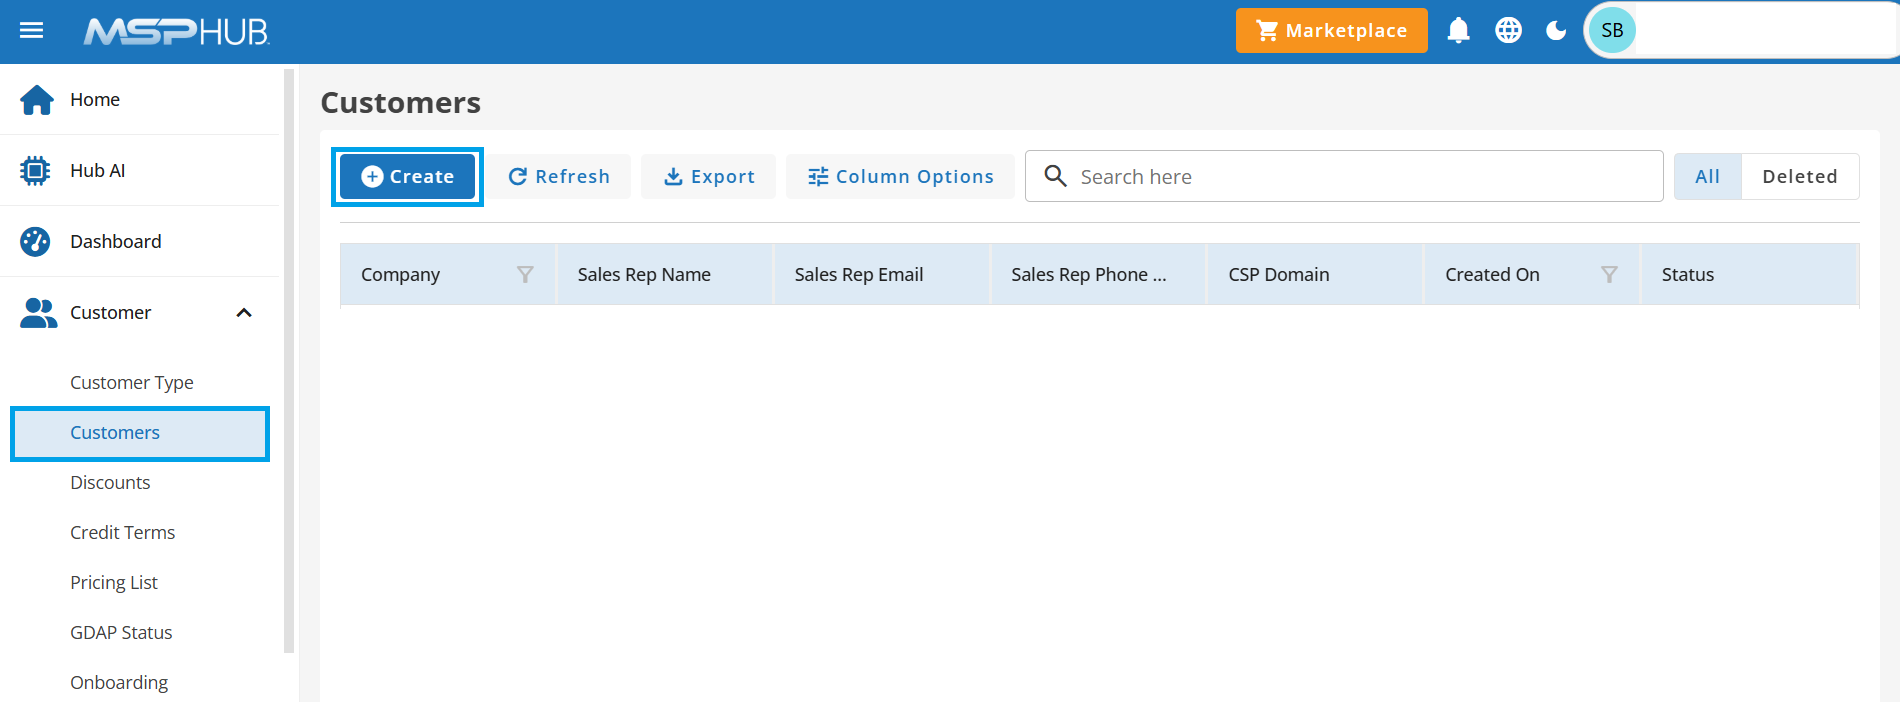
A customer refers to an entity or individual utilizing the products or services. Partners create and manage customer accounts under their accounts. Once created, customers are displayed on the Customers grid page. Partners can enable, disable, modify, or suspend customer accounts based on requirements.
Navigate to Customer Creation:
Go to Main menu → Customer → Customers
Create Customers:
Partners can create a Customer account by clicking on the "Create" option on the Customer grid page.

Step 1: Company Information
This step captures essential details about the customer's organization to ensure accurate billing, subscription management, and account setup. Partners must provide the company’s information, including the address and billing details, to proceed with customer creation. Additionally, the partner-customer relationship is established during this step, enabling the partner to manage the customer’s account and purchases effectively.
Company Name
Enter the official name of the customer’s organization. This name will be used across the platform for identification and billing purposes.
Customer Type
Select the customer type from the drop-down list. This determines the applicable discounts and credit terms.
Refer to Customer Type to define your customer types.Country
Choose the customer's country from the dropdown.
Partner Subscription
Select the appropriate subscription from the drop-down list to manage the billing and invoicing for this customer. This field ensures that all transactions and charges are associated with the correct subscription for seamless invoicing.
Refer to Subscriptions to define your subscriptions.
Company Address:
Enter the complete company address.
Address Line 1:
Provide the primary address for the customer’s organization. This could be the headquarters or a key operational address.
Address Line 2 (Optional):
Enter additional address details, such as suite or building information, if applicable.
City:
Enter the city where the customer is located.
State:
Select the state or province from the dropdown. This field is dependent on the selected country.
ZIP Code:
Provide a valid postal code. This ensures accuracy in correspondence and billing.

Billing Address:
Enter the complete billing address. Enable this checkbox to auto-fill the billing address with the details provided under the company address.
Billing Profile Name:
Enter a custom billing name, such as headquarters, a specific department, or a branch, to identify this billing profile. It should represent the billing entity.
Bill To:
Provide the name of the organization responsible for paying the bills. This could be the customer’s parent company, a department, or a third-party entity.
Address Line 1
Provide the primary billing address.
Address Line 2 (Optional):
Enter additional billing address details, such as suite or floor information.
City:
Enter the city for the billing address.
State:
Select the state or province from the dropdown.
ZIP Code:
Provide the postal code for the billing address.
Country:
Choose the country for the billing address.

Step 2: Contacts
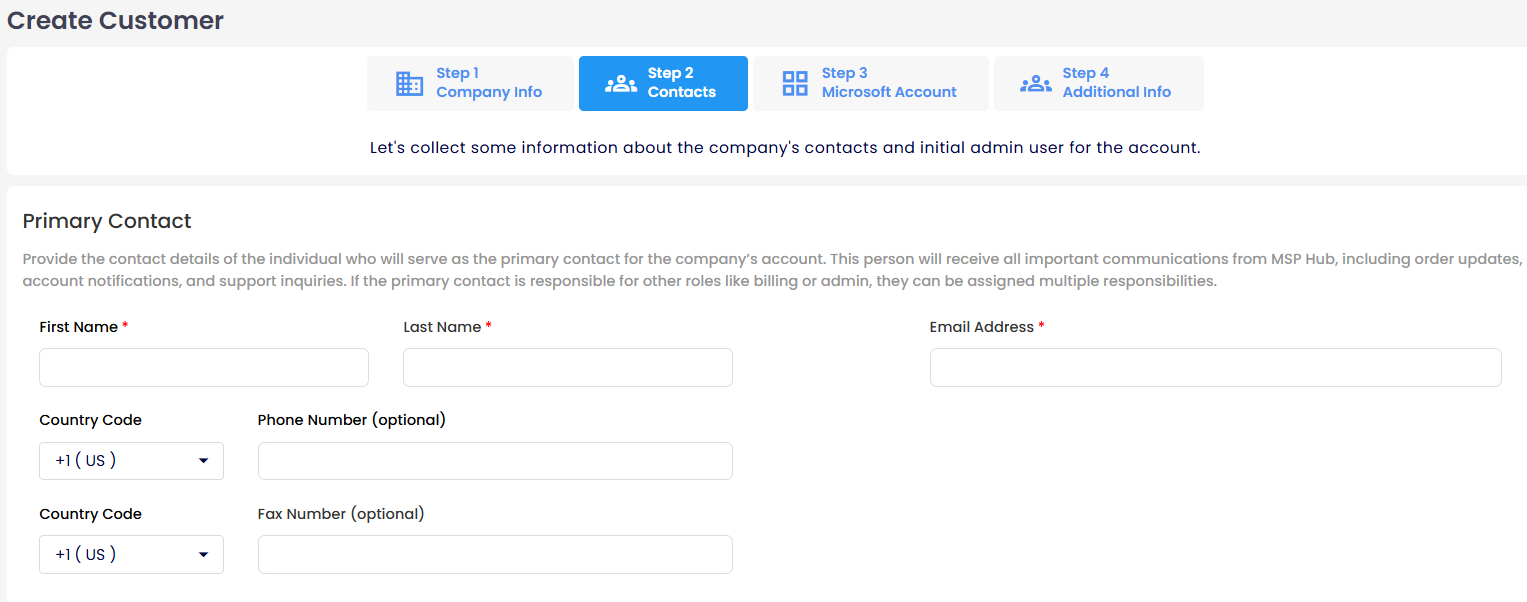
This step focuses on gathering the key contact information for the customer’s account. It ensures proper communication, billing management, and account setup by identifying the roles of the Primary Contact, Billing Contact, and Admin User.
Primary Contact
Provide the contact details of the individual who will serve as the primary contact for the company’s account. This person will receive all important communications from MSP Hub, including order updates, account notifications, and support inquiries. If the primary contact is responsible for other roles like billing or admin, they can be assigned multiple responsibilities.
- First Name & Last Name: Enter the full name of the primary contact.
- Email Address: Provide a valid email address for communication.
- Phone Number (Optional): Include the contact’s phone number for direct communication.
- Fax Number (Optional): Add the fax number if applicable.
- Country Code: Select the appropriate country code for the contact’s phone and fax numbers.

Billing Contact
This field is for the person responsible for managing all billing-related tasks. If the billing contact is the same as the primary contact, you can use the import contact info link to autofill the details. Otherwise, manually enter the appropriate contact information.
- First Name & Last Name: Enter the full name of the billing contact.
- Email Address: Provide the email address used for billing correspondence.
- Phone Number (Optional): Include a phone number for billing-related inquiries.
- Fax Number (Optional): Add a fax number if necessary.
- Country Code: Select the appropriate country code for the contact’s phone and fax numbers.

Admin User
The admin user will have permission to manage account settings, create and invite users, and configure user roles. Enter the details of the individual responsible for these administrative tasks. Admin user information is available during tenant creation only.
- First Name & Last Name: Enter the admin user’s full name.
- Login Email Address: Provide a valid email address. Once the tenant is created, the login email address cannot be changed.
- Display Name (Optional): This name will be displayed across the platform for identification purposes. It defaults to the First and Last Name fields but can be customized to better reflect the user’s role or preferences.
- Additional Communication Email Address: Provide a secondary email address where important account credentials, system communications, and any user notifications will be sent. Ensure this email address is accessible and monitored regularly.
Click Continue to proceed to the next step after filling in all the necessary information.

Step 3: Microsoft Account
This step ensures that the customer's Microsoft account is set up correctly for purchasing Microsoft products. A Microsoft account is mandatory for managing licenses, subscriptions, and services related to Microsoft products.
Microsoft Account Options
1. The company has an existing Microsoft account
If the customer already has a Microsoft account, the existing details will be verified and linked.
Locate Account
To continue, select the country and enter the company’s domain or name to find the associated Microsoft account. Double-check the information entered to ensure the correct account is located. If no Microsoft account exists, proceed with creating a new account.
- Country: The country associated with the customer’s domain. This is automatically selected based on the customer’s location.
- Domain Name: Enter the company’s domain name to search for the associated Microsoft account. This must be the complete domain name (e.g., example.com).
Once the domain name is entered, click Search for Account to verify if the account exists. If the account is not found, proceed to create a new one.

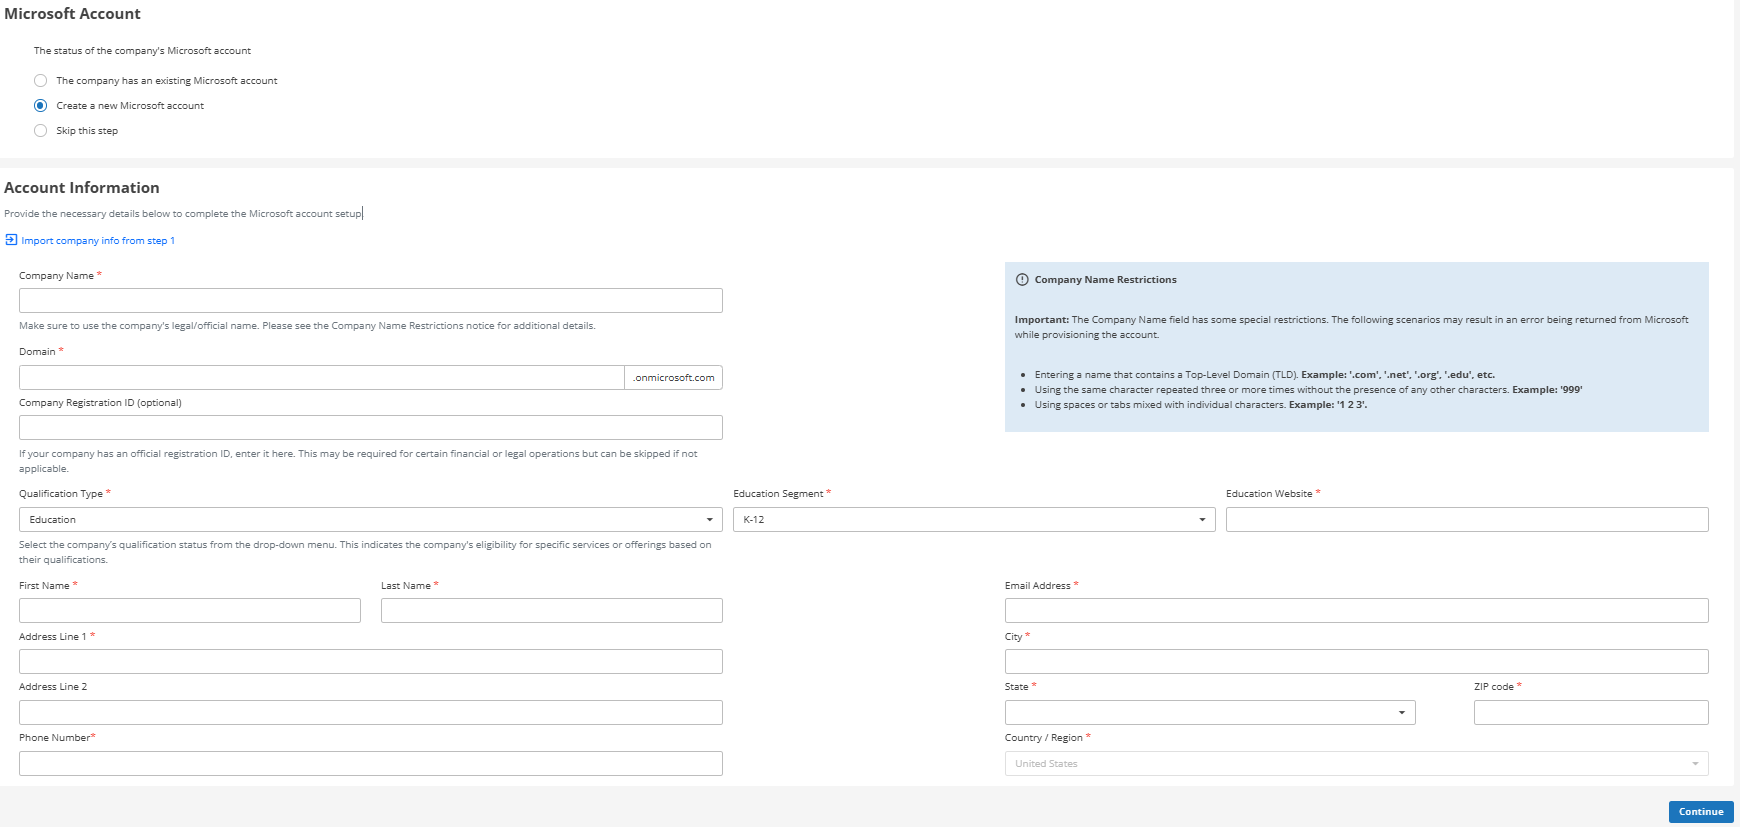
2. Create a new Microsoft account
If the customer does not have an existing Microsoft account, the Partner can create a new Microsoft account for their customers. The following fields are required to complete the Microsoft account setup:
Import Company Info from Step 1
If company details were already entered in the previous step, click the Import company info from the Step 1 option. This will automatically populate the relevant fields, saving time and reducing errors.
Company Name
Enter the legal or official name of the company. Ensure this matches the company's registration details to avoid errors.
Domain
Provide the company’s domain name that will be used for the Microsoft account. The domain will automatically append .onmicrosoft.com. Ensure the domain is unique and does not conflict with existing accounts.
Company Registration ID (Optional)
If applicable, enter the company’s official registration ID. This might be required for legal or financial processes.
Qualification Type
Select the appropriate qualification status from the drop-down menu. The available options may include:
i. Commercial: For business or corporate entities.
ii. Education: For educational institutions. You need to select the appropriate segment and enter the educational institution's website.
 iii. Non-Profit (Charity): For registered non-profit organizations.
First Name
Enter the first name of the primary contact person for the account.
Last Name
Enter the last name of the primary contact person for the account.
Address Line 1
Provide the primary address of the company.
Address Line 2 (Optional)
Enter additional address details if required.
Phone Number
Enter a valid contact number for the company. This will be used for verification.
Email Address
Provide an email address associated with the company. This will serve as the primary contact email address for the account.
City
Enter the city where the company is located.
State
Specify the state or region of the company’s location.
Country/Region
This field defaults to the United States. Confirm or update as necessary.
ZIP Code
Enter the postal code for the company’s address.

3. Skip this step
If the customer is not purchasing Microsoft products, this step can be bypassed.

Step 4: Additional Information
In this step, you must provide details about the Sales Representatives.
Sales Representative (Optional)
Provide the details of the sales representatives who will manage the customer’s account. They will serve as the primary point of contact for inquiries, orders, and assistance. For added support, you may include information for up to three sales representatives, ensuring the customer has consistent and accessible communication. Accuracy in this field helps ensure smooth service delivery in the future.
Name
Enter the name of the sales representative.
Email Address
Provide the email address of the sales representative for reliable communication.
Phone Number (Optional)
Enter a phone number, if available, to ensure faster communication.
Note
- You can add a minimum of 1 and a maximum of 3 sales representatives.
- To remove a representative, use the X button next to their entry.
After entering all the required details, click Continue to proceed.

The customer will receive their credentials and portal link at the provided email address. Using these credentials and the URL, the customer can access the MSP Hub portal.
Customers Overview Page

Purchasing Products for Customers
MSP Hub offers options to purchase products for specific customers. Partners can purchase products for their customers by clicking the cart icon on the customer grid page. When the cart icon is clicked, the CSP Accounts pop-up opens, where partners must select a subscription and a CSP account. After selecting, they are redirected to the product purchase page, where all available products for the customer are displayed. Partners must then choose and purchase the appropriate products for their customers.
Click here to know more about Product Purchase Flow
When a specific customer is selected from this grid, the Customer Details Page opens. This page includes multiple tabs that organize all the customer's information and activities in a structured manner. The available tabs are:
- Products: Lists all the products purchased by the customer.
- Orders: Displays the customer's order history.
- Invoices: Shows the invoices generated for the customer.
- Subscriptions: Contains active or inactive subscription details.
- CSP Accounts: Lists linked Microsoft CSP accounts.
- Audit Logs: Tracks user activity and actions for transparency.
- Users: Shows all users created under the selected customer.
- Profile: Displays and allows editing of customer profile information.
The Products tab displays a list of all products purchased by the selected customer, along with relevant details such as status, product name, category, billing frequency, purchase quantity, and purchase date.
By clicking the Purchase button, users are redirected to the product purchasing page, where they can initiate a new purchase for the customer.
Click here to know more about Product


